About the Juniper to MikroTik series
In the world of network engineering, learning a new syntax for a NOS can be daunting if you need a specific config quickly. Juniper is a popular option for service providers/data centers and is widely deployed across the world.
This is a continuation of the Rosetta stone for network operating systems series. We’ll be working through several protocols over series of posts to help you quickly move between different environments.
While many commands have almost the exact same information, others are as close as possible. Since there isn’t always an exact match, sometimes you may have to run two or three commands to get the information needed.
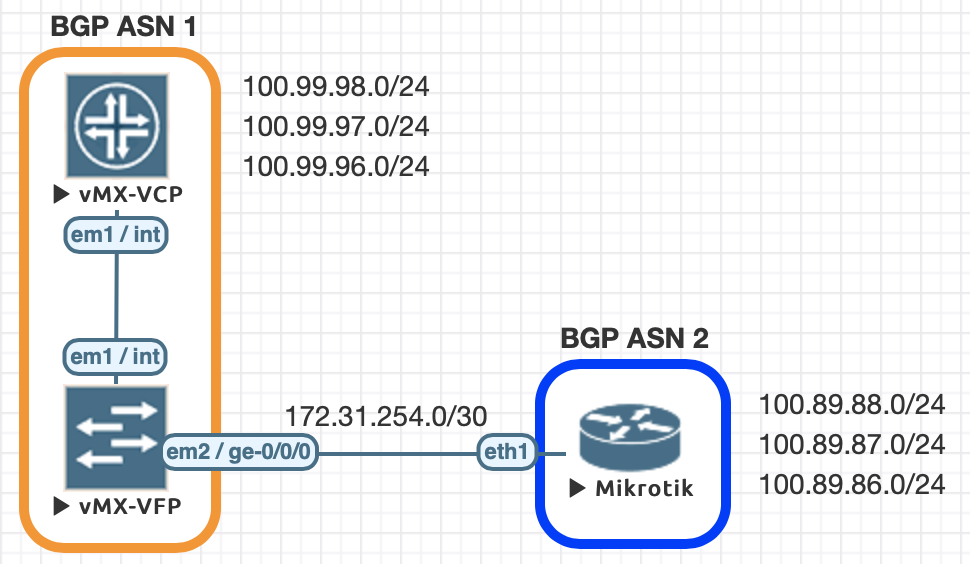
Using EVE-NG for testing
We conducted all of this testing utilizing EVE-NG and the topology seen below.
| Juniper Command | MikroTik Command |
|---|---|
| show bgp summary | routing bgp peer print brief |
| show bgp neighbor | routing bgp peer print status |
| show route advertising-protocol bgp 172.31.254.2 | routing bgp advertisements print peer=peer_name |
| show route receive-protocol bgp 172.31.254.2 | ip route print where received-from=peer_name |
| show route protocol bgp | ip route print where bgp=yes |
| clear bgp neighbor 172.31.254.2 soft-inbound | routing bgp peer refresh peer_name |
| clear bgp neighbor 172.31.254.2 soft | routing bgp peer resend peer_name |
| set routing-options autonomous-system 1 | /routing bgp instance set default as=2 |
| set protocols bgp group EBGP type external set protocols bgp group EBGP peer-as 2 set protocols bgp group EBGP neighbor 172.31.254.2 | /routing bgp peer add name=PEER-1 remote-address=172.31.254.1 remote-as=1 |
| set policy-options policy-statement REDIS-CONNECTED term 1 from protocol direct set policy-options policy-statement REDIS-CONNECTED term 1 then accept set protocols bgp group EBGP export REDIS-CONNECTED | /routing bgp network add network=100.89.88.0/24 add network=100.89.87.0/24 add network=100.89.86.0/24 |
| set routing-options static route 0.0.0.0/0 discard set protocols bgp group EBGP export SEND-DEFAULT set policy-options policy-statement SEND-DEFAULT term 1 from protocol static set policy-options policy-statement SEND-DEFAULT term 1 from route-filter 0.0.0.0/0 exact set policy-options policy-statement SEND-DEFAULT term 1 then accept | /routing bgp peer add default-originate-always name=PEER-1 remote-address=172.31.254.1 remote-as=1 |
Examples of the commands above
This is a quick way to get a list of the peers/ASN and their status
[admin@MIKROTIK-BGP] > routing bgp peer print brief

root@JUNOS-BGP> show bgp summary

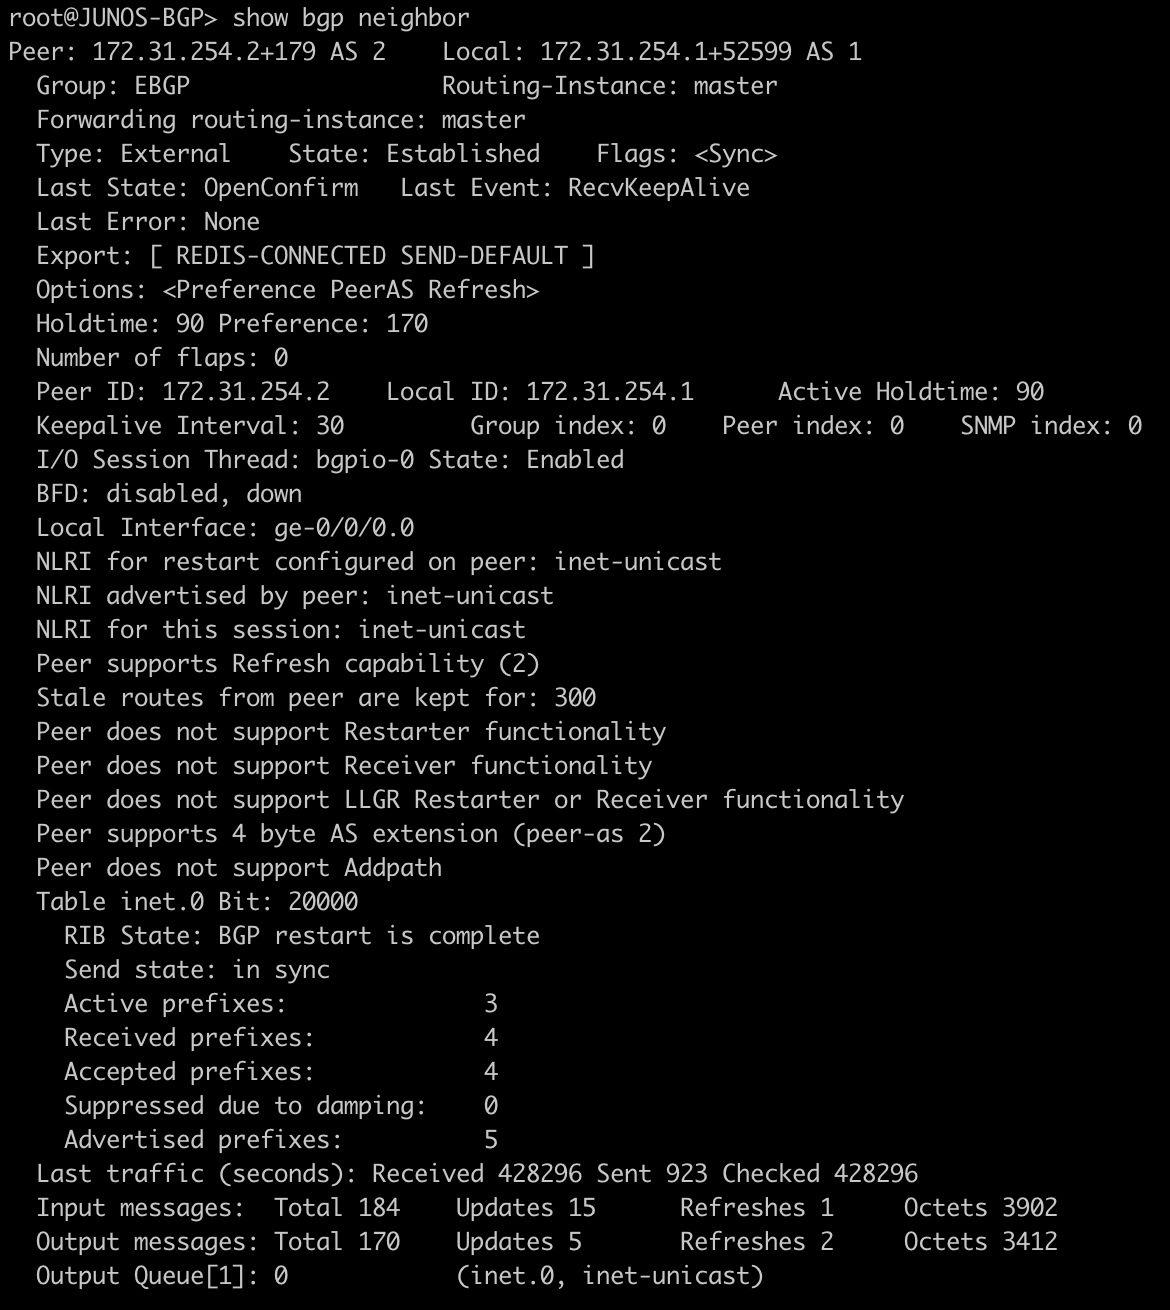
This next command will show you more information about a peer. In this case we did not specify the peer as there is only one. On a peering router with multiple peers it is recommended to look only at specific peer information to not be overwhelmed with irrelevant information.
[admin@MIKROTIK-BGP] > routing bgp peer print status

root@JUNOS-BGP> show bgp neighbor
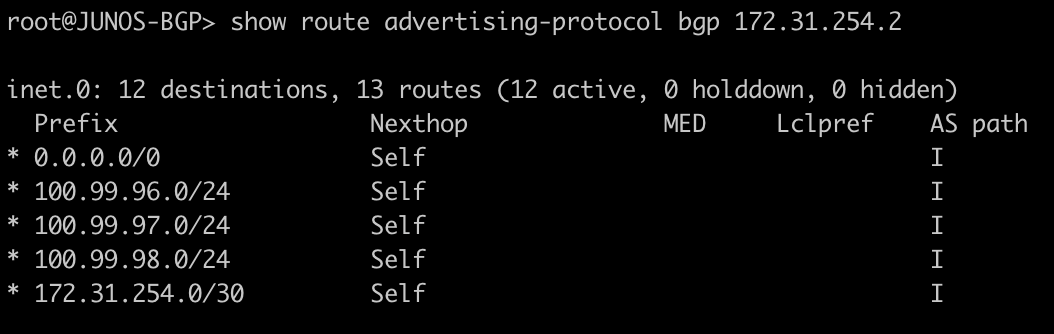
The next command allows you to see the prefixes that are sent to your peer as well as the next-hop associated with it.
[admin@MIKROTIK-BGP] > routing bgp advertisements print peer=PEER-1

root@JUNOS-BGP> show route advertising-protocol bgp 172.31.254.2
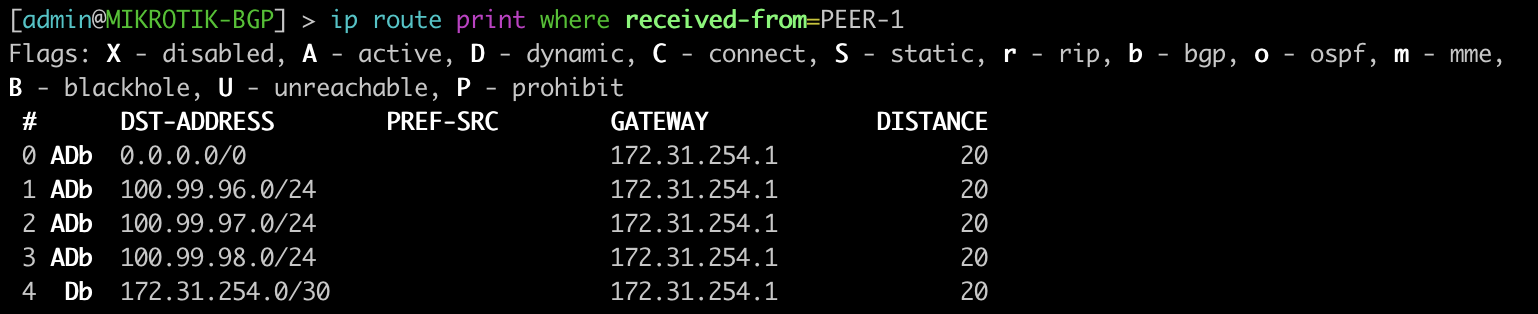
This next one will show you what routes were received from the peer and the next-hop you will advertise.
[admin@MIKROTIK-BGP] > ip route print where received-from=PEER-1
root@JUNOS-BGP> show route receive-protocol bgp 172.31.254.2

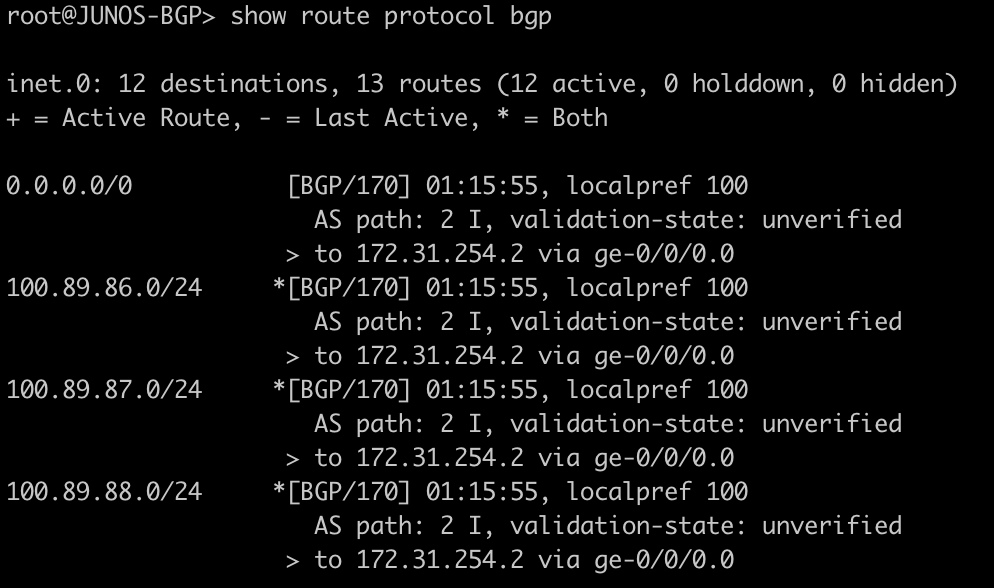
Here we will see the BGP prefixes that are in the routing table – both active and not. On junOS you will see the count for hidden routes in the output but you will not see the hidden entries. This will require the use of “show route protocol bgp hidden” to see the hidden entries. On mikrotik you will see this type of route in the route table as inactive.
[admin@MIKROTIK-BGP] > ip route print where bgp=yes

root@JUNOS-BGP> show route protocol bgp
Configure BGP instance, peering, and originate a default route.
Here is a very basic BGP peering configuration to establish a peer, advertise a few routes, and originate a default route.
Let’s look at some of the differences in the configuration.
It’s worth noting that everything in CAPS was manually defined .
On junOS there is no concept of the “network” command that you might see in MikroTik or Cisco.
To accomplish the same functionality in this example I used a policy-statement named REDIS-CONNECTED that matched any connected route for redistribution.
This is then applied as an export statement into the EBGP peer group. Likewise, there is not a construct for “default-originate”. In order to accomplish the same functionality, we created a static route to discard and exported this to the EBGP peer.
MikroTik BGP Configuration
/routing bgp instance
set default as=2
/routing bgp network
add network=100.89.88.0/24
add network=100.89.87.0/24
add network=100.89.86.0/24
/routing bgp peer
add default-originate=always name=PEER-1 remote-address=172.31.254.1 remote-as=1
Juniper BGP Configuration
set interfaces lo0 unit 0 family inet address 100.99.98.1/24
set interfaces lo0 unit 0 family inet address 100.99.97.1/24
set interfaces lo0 unit 0 family inet address 100.99.96.1/24
set routing-options static route 0.0.0.0/0 discard
set routing-options autonomous-system 1
set protocols bgp group EBGP type external
set protocols bgp group EBGP export REDIS-CONNECTED
set protocols bgp group EBGP export SEND-DEFAULT
set protocols bgp group EBGP peer-as 2
set protocols bgp group EBGP neighbor 172.31.254.2
set policy-options policy-statement REDIS-CONNECTED term 1 from protocol direct
set policy-options policy-statement REDIS-CONNECTED term 1 then accept
set policy-options policy-statement SEND-DEFAULT term 1 from protocol static
set policy-options policy-statement SEND-DEFAULT term 1 from route-filter 0.0.0.0/0 exact
set policy-options policy-statement SEND-DEFAULT term 1 then accept
More to come
There are so many commands to consider for BGP, we probably could have added close to 100, but we decided to list the commands we use most often to start with and will be adding to the list of BGP commands as well as other like OSPF, MPLS, and VLANs in future posts.