The challenge of adding IPv6 to your WISP
IPv6 is one of those technologies that can feel pretty overwhelming, but it doesn’t have to be. Many of the same ideas and concepts learned in IPv4 networking still apply.
This guide is meant to give you an overview of an example IPv6 addressing plan for an entire WISP as well as the config needed in MikroTik to deploy IPv6 from a core router all the way to a subscriber device.
Benefits of adding IPv6
- Public addressing for all subscribers – reduced need for NAT
- Regulatory compliance – public addressing that is persistent makes it much easier to be compliant for things like CALEA
- Reduced complaints from gamers – Xbox and Playstation both have IPv6 networks and prefer IPv6. This reduces complaints from customers who have gaming consoles that have detected an “improper” NAT configuration.
- Increased security – IPv6, while not impervious to security threats makes it much harder for attackers to scan IPs due to the sheer size of the IP space. If using privacy extensions with SLAAC, it also makes it much harder to target someone online as the IP address seen on the internet changes randomly.
- Improved real time communications – one way audio and video issues are often caused by NAT. Using end to end connectivity on public addressing improves the reliability of IP voice and video when used on IPv6
- Web scale content (Netflix, Facebook, Google, etc) is IPv6 enabled which means a large portion of your traffic will shift to native IPv6 once dual stack is enabled.
IPv6 Addressing
One of the things i’ve learned about IPv6 is that addressing plans seem to spark epic debates about the waste of addresses and what size prefix an end subscriber should get.
Although this lab could have easily been done with a /56 at the tower and /53 at each AP, I decided to use RIPEs recommendations from their guide on IPv6 best operational practices.
This is mainly to keep the focus of the article on actually getting IPv6 deployed and not focusing on the addressing.
Dual Stack
For simplicity, the IPv4 config is not shown, but the recommended design for an operational WISP is to implement IPv4 and IPv6 side by side in a Dual Stack configuration.
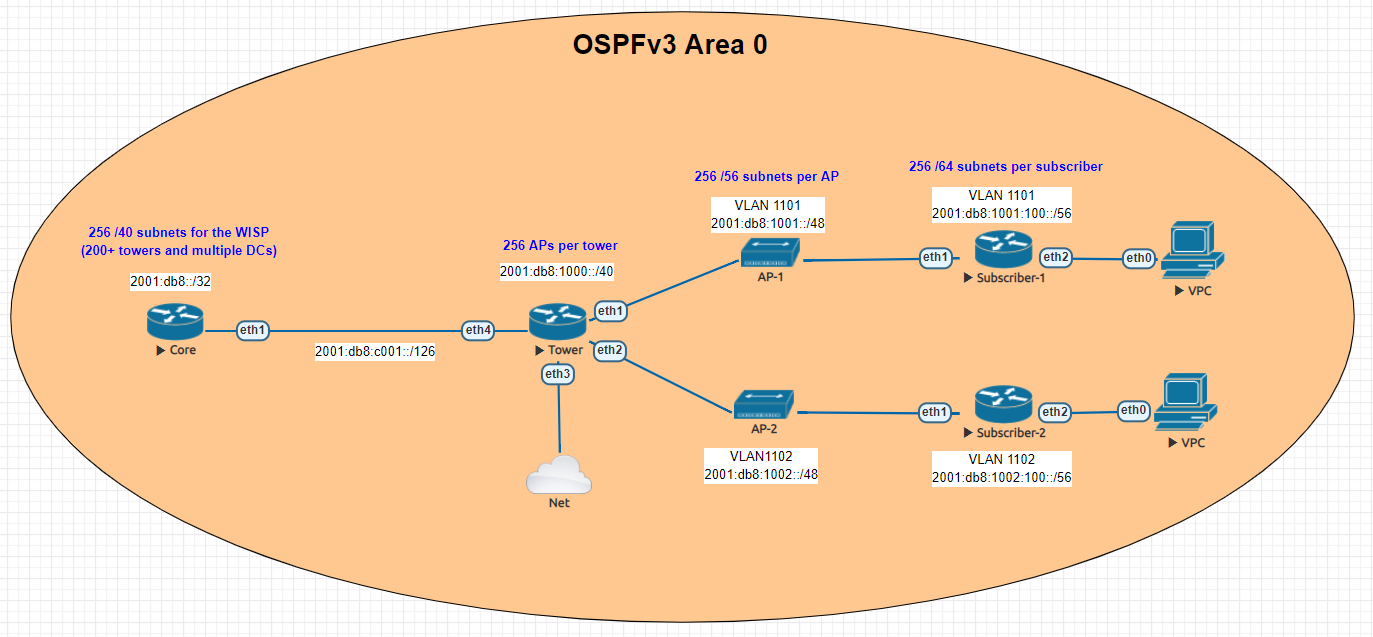
Lab Overview
The lab is designed to illustrate most of the operational aspects of IPv6 in a WISP using MikroTik CHR routers in EVE-NG. This includes:
- DHCPv6 and Prefix Delegation (PD)
- OSPFv3 single area configuration and origination of a default route
- Subscriber router example with SLAAC
Core Router

In the lab, the core router is shown directly connected to the tower for simplicity, in your WISP, there may be multiple towers between the core and the end of the network.
The concept, however is the same – use /126 addressing to connect towers for OSPFv3.
Note that OSPFv3 still requires a router-id in dotted decimal format, even though the address you put int doesn’t have to actually exist – for consistency however, use the IPv4 loopback of the router for the router id.
The internet connectivity isn’t shown in this lab, but your ISP will give you a /126 address to connect to your border router and either peer with BGP or the provider can route the /32 prefix to you.
Config
/interface wireless security-profiles
set [ find default=yes ] supplicant-identity=MikroTik
/routing ospf-v3 instance
set [ find default=yes ] distribute-default=always-as-type-1 router-id=\
    100.127.1.1
/ip dhcp-client
add disabled=no interface=ether1
/ipv6 address
add address=2001:db8:c001::1/126 advertise=no interface=ether1
/routing ospf-v3 interface
add area=backbone interface=ether1
/system identity
set name=Core
/tool romon
set enabled=yes
Tower Router
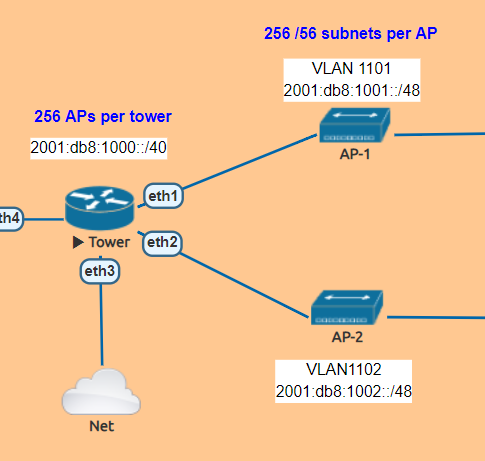
The tower router is handling most of the work as it is responsible for DHCPv6 and Prefix Delegation as well as advertising the /48 AP subnets into OSPF
In this lab , the APs are split into separate VLANs (with dual stack, IPv4 would exist on the same VLAN).
The router is configured to hand out /56 prefixes to the end subscriber using a pool of /48 per AP.
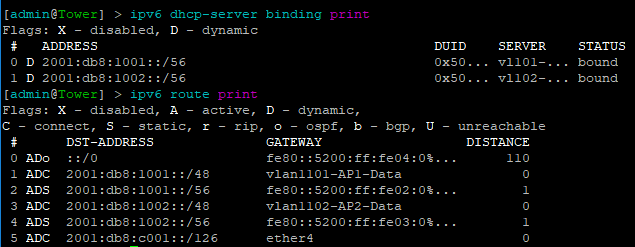
Because Prefix Delegation is being utilized, a dynamic static route is created for each /56 the DHCPv6 server hands out which eliminates the need to use a routing protocol.
Prefix Delegation in action
This example shows the prefixes allocated by the router and the dynamic static routes created
Config
/interface bridge
add name=Lo0
/interface vlan
add interface=ether1 name=vlan1101-AP1-Data vlan-id=1101
add interface=ether2 name=vlan1102-AP2-Data vlan-id=1102
/interface wireless security-profiles
set [ find default=yes ] supplicant-identity=MikroTik
/ipv6 dhcp-server
add address-pool=vl101-v6-pd-pool interface=vlan1101-AP1-Data name=\
    vl101-v6-pd
add address-pool=vl102-v6-pd-pool interface=vlan1102-AP2-Data name=\
    vl102-v6-pd
/ipv6 pool
add comment="VLAN1101 IPv6 prefix delegation pool" name=vl101-v6-pd-pool \
    prefix=2001:db8:1001::/48 prefix-length=56
add comment="VLAN1102 IPv6 prefix delegation pool" name=vl102-v6-pd-pool \
    prefix=2001:db8:1002::/48 prefix-length=56
/routing ospf-v3 instance
set [ find default=yes ] router-id=100.127.1.2
/ip dhcp-client
add disabled=no interface=ether1
/ipv6 address
add address=2001:db8:1001::1/48 advertise=no interface=vlan1101-AP1-Data
add address=2001:db8:1002::1/48 advertise=no interface=vlan1102-AP2-Data
add address=2001:db8:c001::2/126 advertise=no interface=ether4
/ipv6 nd
add interface=vlan1101-AP1-Data managed-address-configuration=yes \
    other-configuration=yes
add interface=vlan1102-AP2-Data managed-address-configuration=yes \
    other-configuration=yes
/ipv6 nd prefix
add autonomous=no interface=vlan1101-AP1-Data
add autonomous=no interface=vlan1102-AP2-Data
/routing ospf-v3 interface
add area=backbone interface=ether4
add area=backbone interface=vlan1101-AP1-Data
add area=backbone interface=vlan1102-AP2-Data
add area=backbone passive=yes
/system identity
set name=Tower
/tool romon
set enabled=yes
Subscriber Routers

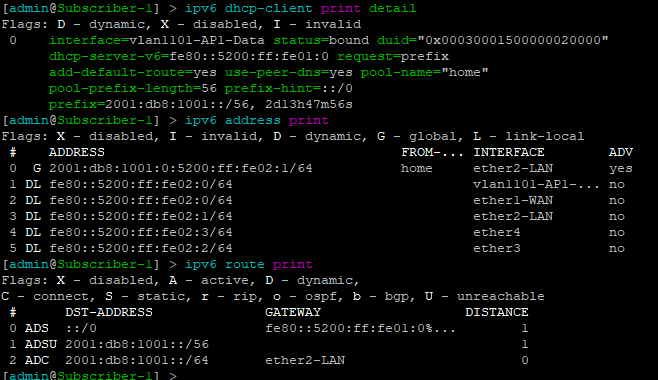
For simplicity, MikroTik is used as the Subscriber or CPE router to provide an example of how the /56 prefix is received from the tower router and handed off to devices inside the subscriber’s home.
In this lab, the “WAN” interface or ether1 has a DHCPv6 client configured to receive the prefix from the tower router.
Ether2 or the “LAN” side, which would include a bridge of the the wireless/wired interfaces in a real router is configured with a dynamic /64 from the /56 pool and is set for SLAAC to give devices on this segment an IPv6 address.
DHCPv6 client and subscriber addresses/routes
Config – Subscriber 1
/interface ethernet
set [ find default-name=ether1 ] name=ether1-WAN
set [ find default-name=ether2 ] name=ether2-LAN
/interface vlan
add interface=ether1-WAN name=vlan1101-AP1-Data vlan-id=1101
/interface wireless security-profiles
set [ find default=yes ] supplicant-identity=MikroTik
/ip dhcp-client
add disabled=no interface=ether1-WAN
/ipv6 address
add eui-64=yes from-pool=home interface=ether2-LAN
/ipv6 dhcp-client
add add-default-route=yes interface=vlan1101-AP1-Data pool-name=home \
    pool-prefix-length=56 request=prefix
/ipv6 nd
add hop-limit=64 interface=ether2-LAN
/system identity
set name=Subscriber-1
/tool romon
set enabled=yes
Config – Subscriber 2
/interface ethernet
set [ find default-name=ether1 ] name=ether1-WAN
set [ find default-name=ether2 ] name=ether2-LAN
/interface vlan
add interface=ether1-WAN name=vlan1102-AP2-Data vlan-id=1102
/interface wireless security-profiles
set [ find default=yes ] supplicant-identity=MikroTik
/ip dhcp-client
add disabled=no interface=ether1-WAN
/ipv6 address
add eui-64=yes from-pool=home interface=ether2-LAN
/ipv6 dhcp-client
add add-default-route=yes interface=vlan1102-AP2-Data pool-name=home \
    pool-prefix-length=56 request=prefix
/ipv6 nd
add hop-limit=64 interface=ether2-LAN
/system identity
set name=Subscriber-2
/tool romon
set enabled=yes
Subscriber Device
EVE-NG has a small Linux image that can be used as a host called VPC or virtual PC. This allows us to put a device on ether2 and test end to end reachability back to the core router.
SLAAC addressing example

Ping test back to the core router
Success!!!!!!!!
