TFW adding the 301st subscriber to your bridged WISP….

Why are bridged networks so popular?
- Getting an ISP network started can be a daunting task. Especially, if you don’t have a networking background.
- Understanding L1/L2/L3 is not easy – I spent a number of years working in IT before I really started to grasp concepts like subnetting, the OSI model and Layer 2 vs. Layer 3. It takes a while.
- Bridged networks are very attractive when first starting out. No subnetting is required and the entire network can be NATted out an upstream router with minimal configuration.
What does a “bridged” network look like?
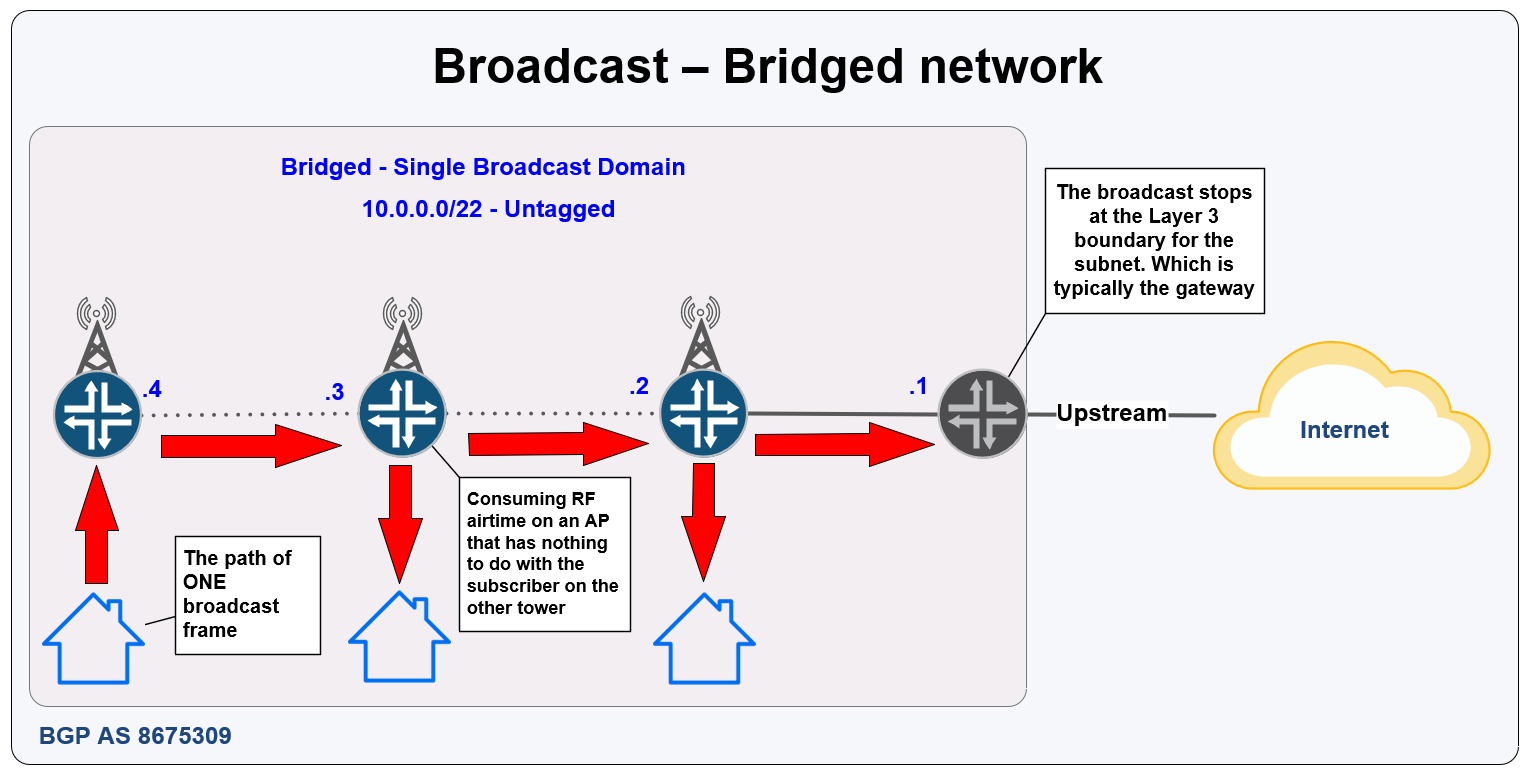
- Bridged networks use a single Layer 3 subnet across the same Layer 2 broadcast domain (typically over switches and software/hardware bridges) which is extended to all towers in the WISP
- Bridging can be done with or without VLANs but they are most commonly untagged.
- The diagram below is a very common example of a bridged WISP network.

What is the difference between switching and bridging?
These days, there isn’t much difference between the two terms, switch is a marketing term for a multiport hardware-accelerated bridge that became popular in the 1990s to distinguish it from hubs which did not separate collision domains. Both types can use VLANs, spanning tree and forward Layer-2 frames to multiple ports
- Bridging (Software) – Most radios use some variant of linux and a bridge that is dependent upon the CPU to forward frames. Most routers will also allow ports to be bridged together in software and the speed is dependent upon system resources and load
- Bridging (Hardware) – Most commonly, you’ll find this in vendors like MikroTik and Juniper. Certain hardware models allow the bridge to be offloaded into hardware instead of CPU so that frames can be forwarded at wire speed
- Switching (Hardware) – This category includes most all ethernet switches. Frames are forwarded using ASICs that depend on a CAM table to hold MAC addresses.
What are some of the issues with bridged Networks?
- Broadcast – One L2 broadcast will go through every radio and backhaul in a WISP network
- ARP Traffic -Also an L2 broadcast type, ARP storms and heavy ARP traffic can easily cripple a bridged network
- MAC Table size limitations – some equipment types have limited MAC table sizes. Often in CPU based equipment, the limitation is either RAM or default settings in the linux bridge which is typically limited to 1024 entries per bridge.
- Scale – Typically anything beyond a /24 (254 hosts) will start to have issues without a number of L2 enhancements like client isolation, MAC filtering, etc. At some point those solutions don’t scale
- Subnetting – ideally you don’t want multiple subnets on the same broadcast domain for security and isolation of failure domains
- Performance – most routers are more efficient in routing packets vs. bridging packets in a larger network.
- Security – Implementing security policies and isolating customers and protected infrastructure is much easier at L3
How does routing help?
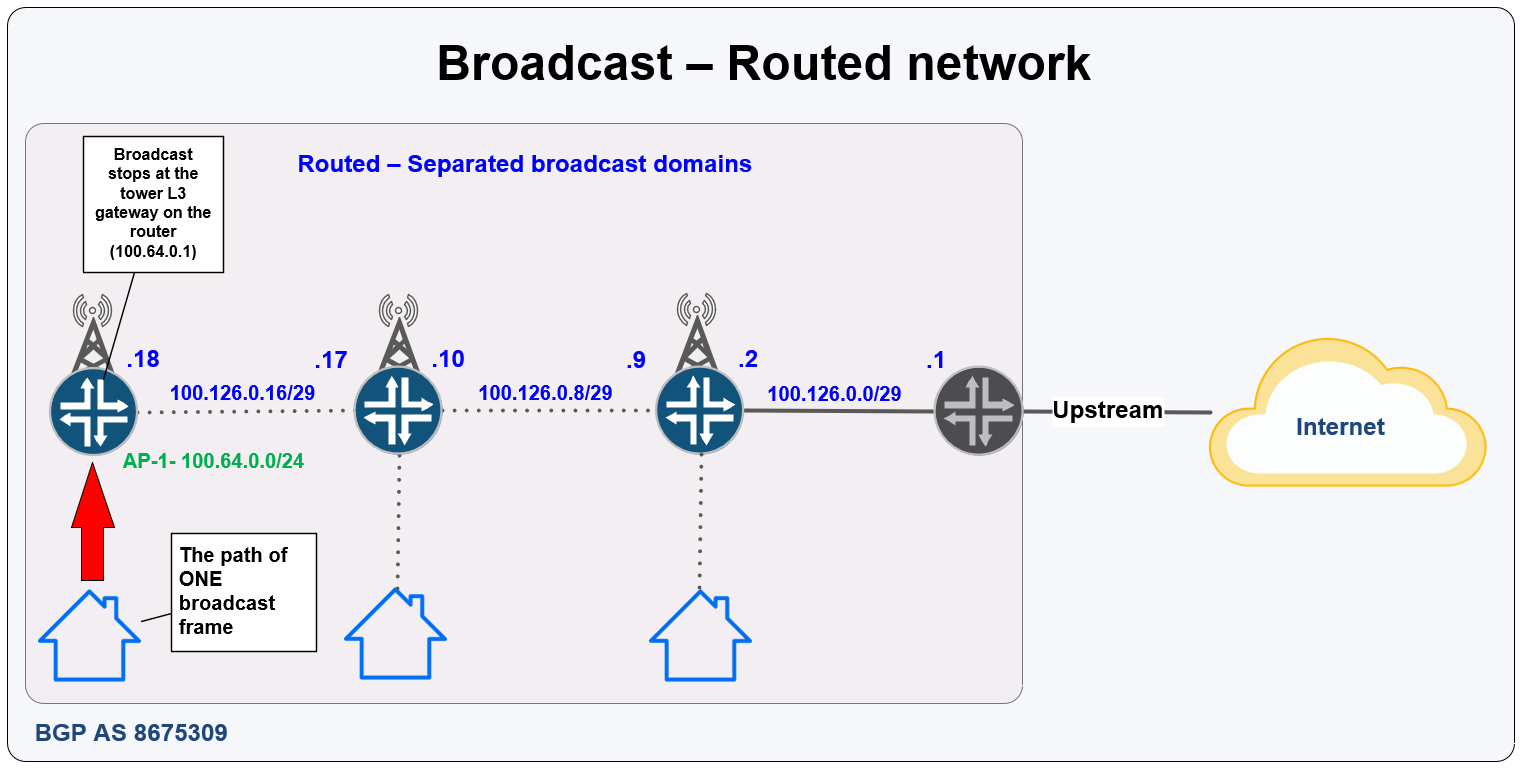
Routing separates broadcast domains
Here is what a single broadcast domain looks like in a bridged network
And to compare, here is the same network but routed
How do I Migrate?
Answer: Patience and planning (and VLANs)
The question you’ve probably been waiting for….how do I migrate? So the dirty little secret is that you don’t have to migrate all at once.
There are a few different ways you can use VLANs to migrate the network one tower at a time.
Where do I start?
- Prep work – be sure to back up all configs and if possible, put together a diagram of your network that includes physical connections and VLANs / Subnets where applicable – this can be done with Visio, LucidChart or using mapping software
- Pick a good time – Look at your monitoring software and pick a day and time that represents your lowest volume of traffic
- Be realistic about time – If you think it will take 1 hour, plan for 4 – you’ll be amazed how often 1 hour turns into 4 🙂
- Have a rollback plan – Understand what steps you need to take to roll back – even better, write it down!
Types of migration
Type 1 – Last mile back to the core – start at the very end of a chain of towers and work your way back in – one tower at a time
- Benefits
- Lower risk, only affecting one or two towers at a time at the end of a chain of towers.
- Doesn’t specifically require VLANs in some network topologies but they are still recommended
- Easy rollback, if it doesn’t work, replace the original config and analyze what went wrong
- If you’re successful, you can move to the next closest tower and repeat the process which continues to shrink the broadcast domain – this also has the side benefit of helping to stabilize your bridged network as you migrate by making it smaller.
- Drawbacks
- Distance – in some networks, getting all the way out to the edge during a late night maintenance window can be a challenge

Type 2 – Core out to the last mile – start at the core or where your bandwidth comes in (often the same place) and work your way out – one tower at a time
- Benefits
- Physically closer to migrate the first hop
- Can use VLANs to keep the existing bridged topology but route to towers that are converted
- Same as the first, if you’re successful, you can move to the next closest tower and repeat the process which continues to shrink the broadcast domain – this also has the side benefit of helping to stabilize your bridged network as you migrate by making it smaller.
- Drawbacks
- Risk – if you have an issue with the first hop, you may take down a larger number of towers than 1 or 2 as compared to the first method.
- Requires more config – you need to preserve the legacy broadcast domain through converted towers and then go back and clean it up

Type 3 – Build L3 to a new tower from the core – If you happen to have a new tower build on deck that will directly connect back to the core (where the gateway for the bridged L3 network is), then you can build a new tower as L3. This helps to understand what’s involved and then use one of the previous two methods to migrate the rest of the network.
- Benefits
- Lowest risk option – building out new sites in a different design is one of the lowest risk ways to migrate
- No need for rollback – it’s new and not in service, so if you don’t get it right on the first try, you can keep working on it
- Drawbacks
- There aren’t any major drawbacks to this approach, except the rest of the network must still be migrated using one of the previous two methods

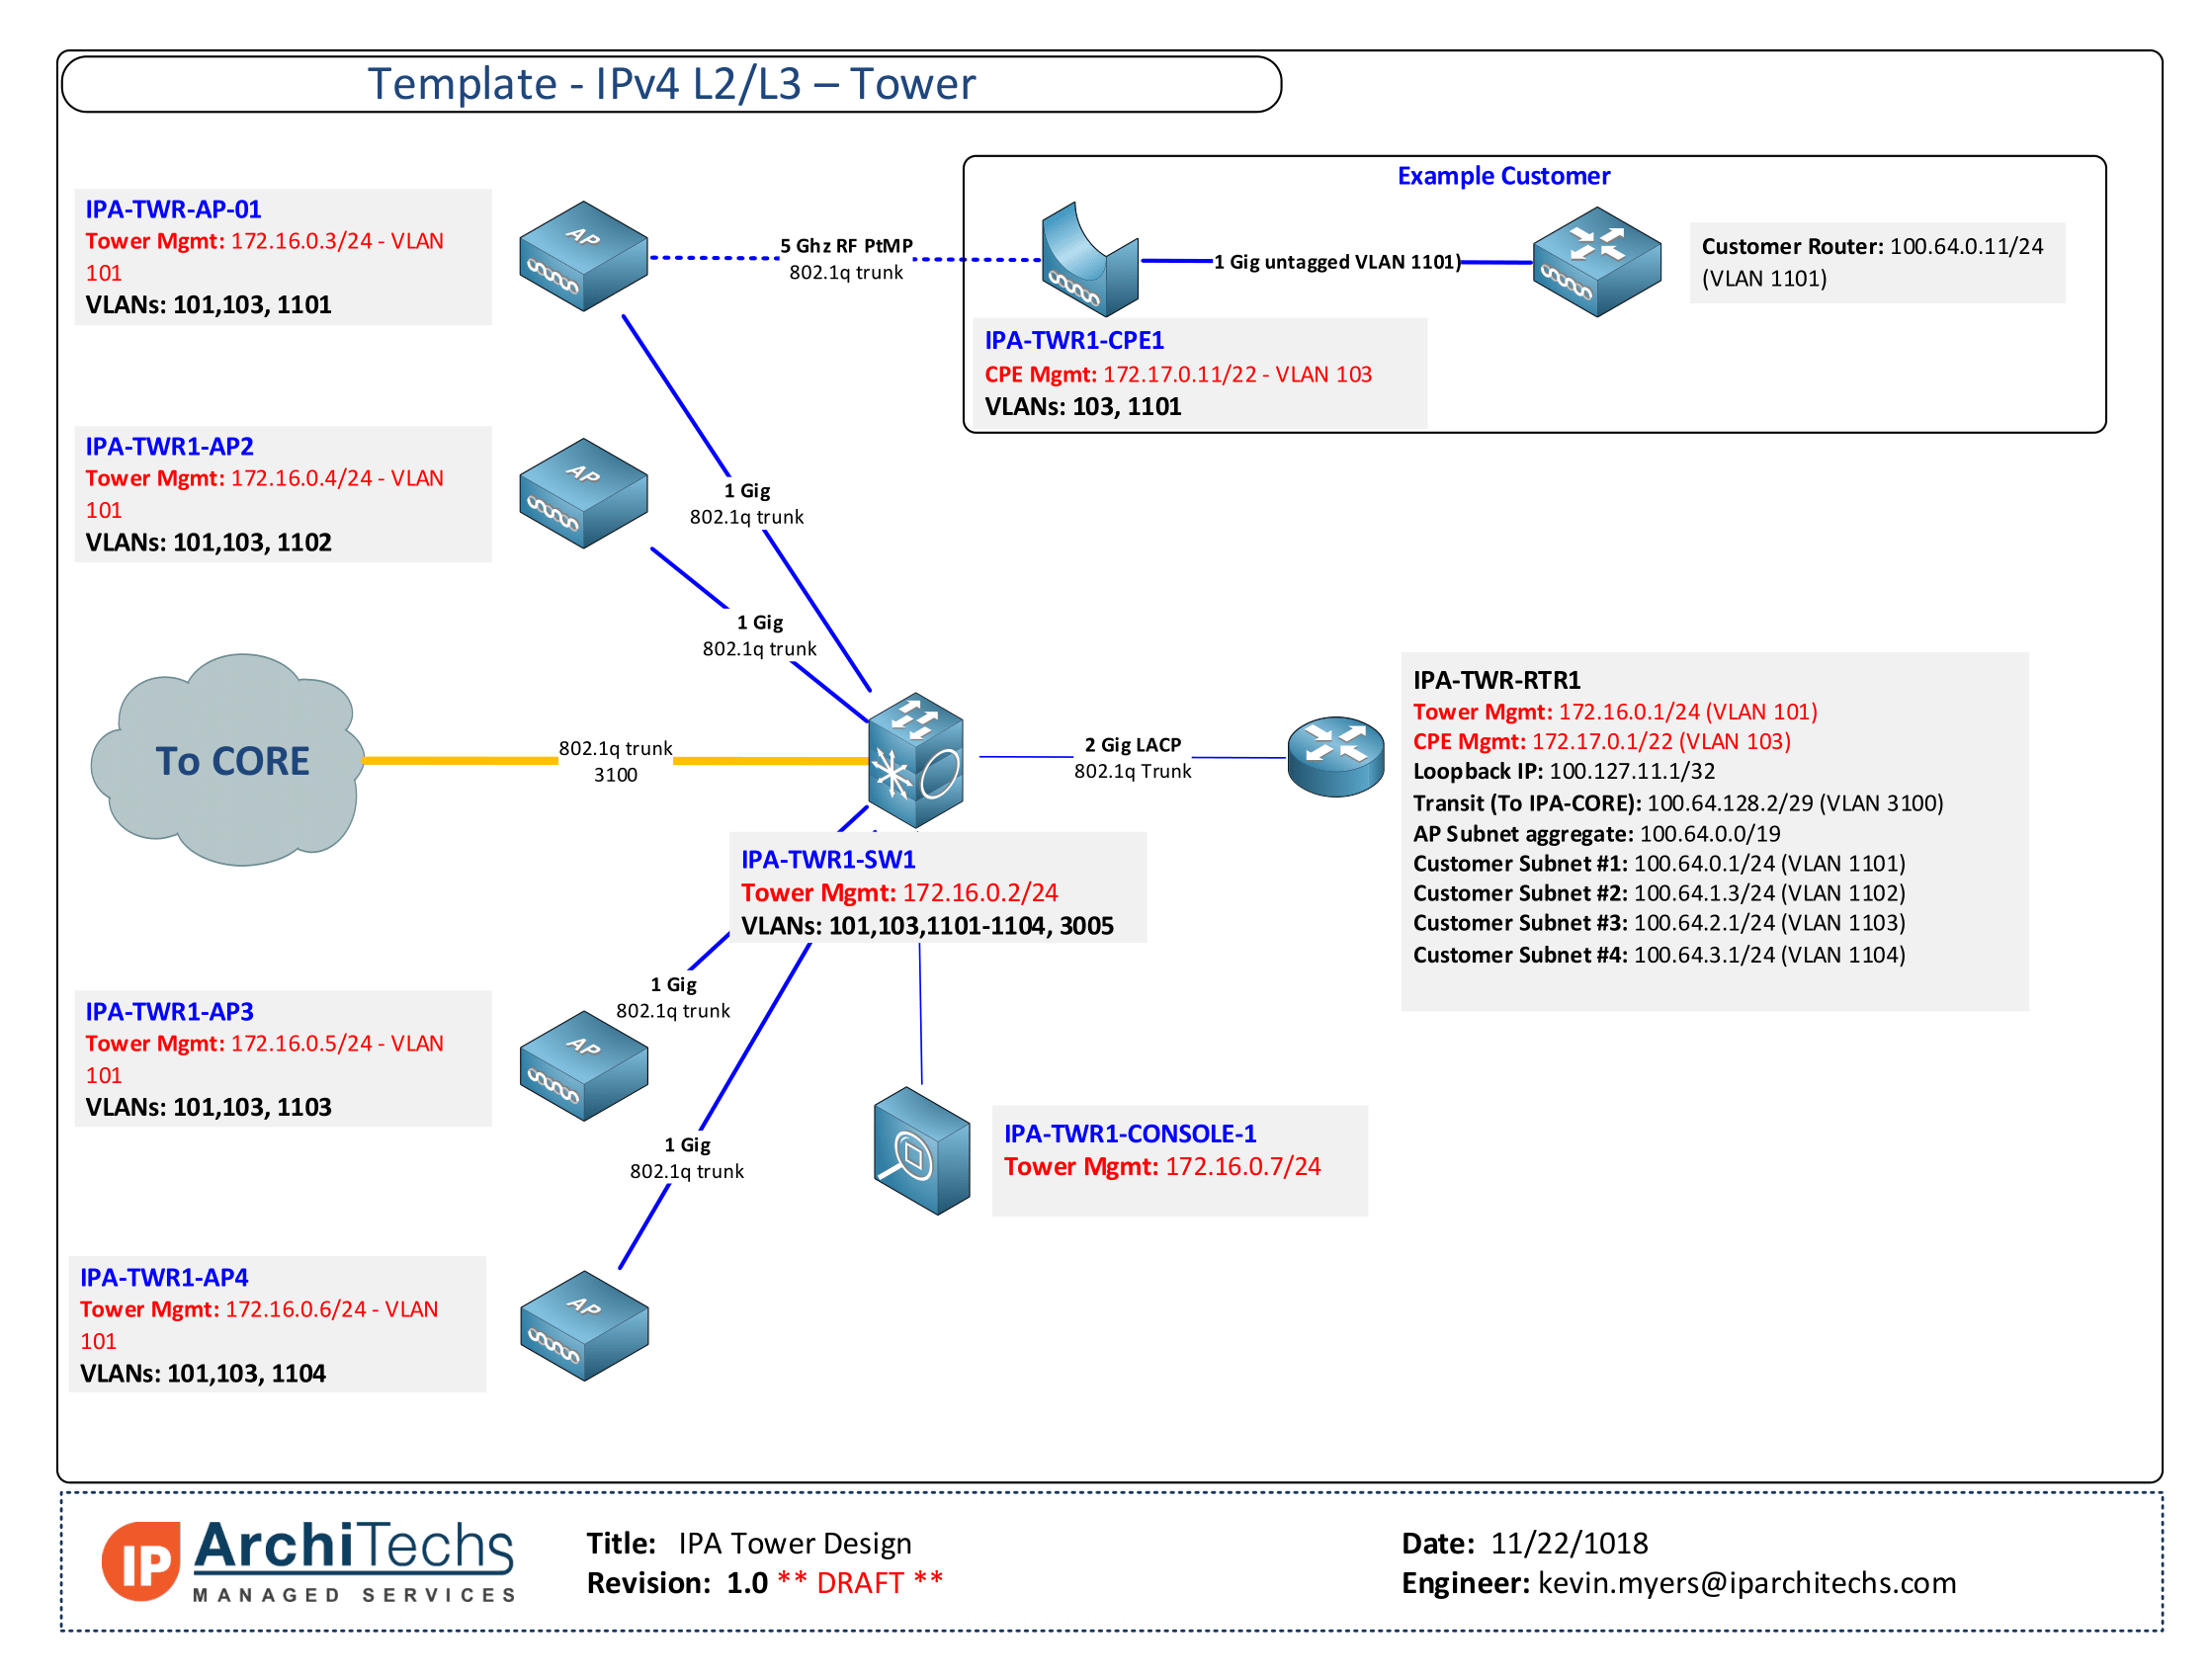
Using switch-centric design to assist with migration
In order to pass VLANs and the legacy broadcast domain through the network easier, consider putting all physical links into a switch at the core and the tower instead of directly into the router.
This type of design makes operation of the WISP significantly easier as new subnets and services that are needed don’t always need a trip to the tower to add cabling.
It also makes config migration easier when upgrading the tower router by putting most of the interface references into VLANs instead of physical interfaces.
Example of a switch-centric tower design
Closing thoughts…
This will help to get you started down the road to migration. Using a virtual lab like EVE-NG or GNS3 will help to understand the concepts before you deploy it in prod and is a good addition to the process.
Take your time and think through what you want to do and write down your plan – often you’ll find gaps when you create a list of steps which you can correct before migration and save time.
Good luck!
Need help with your Migration? Call the WISP experts at IP ArchiTechs