Moving away from incumbent network vendors

One of the challenges service providers have faced in the last decade is lowering the cost per port or per MB while maintaining the same level of availability and service level.
And then add to that the constant pressure from subscribers to increase capacity and meet the rising demand for realtime content.
This can be an especially daunting task when routers with the feature sets ISPs need cost an absolute fortune – especially as new port speeds are released.

Whitebox, also called disaggregated networking, has started changing the rules of the game. ISPs are working to figure out how to integrate and move to production on disaggregated models to lower the cost of investing in higher speeds and feeds.
Whitebox often faces the perception problem of being more difficult to implement than traditional vendors – which is exactly why I wanted to highlight some of the work we’ve been doing at iparchitechs.com integrating whitebox into production ISP networks using IP Infusion’s OcNOS.
Things are really starting to heat up in the disaggregagted network space after the announcement by Amazon a few days ago that it intends to build and sell whitebox switches.
As I write this, I’m headed to Networking Field Day 18 where IP Infusion will be presenting and I expect whitebox will again be a hot topic.
This will be the second time IPI has presented at Networking Field Day but the first time that I’ve had a chance to see them present firsthand.
It’s especially exciting for me as I work on implementing IPI on a regular basis and integrating OcNOS into client networks.
What is OcNOS?
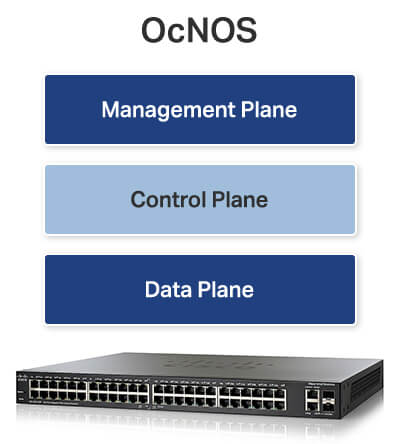
IP Infusion has been making network operating systems (NOS) for more than 20 years under the banner of its whitelabel NOS – ZebOS.
As disaggregated networking started to become popular, IPI created OcNOS which is an ONIE compatible NOS using elements and experience from 20 years of software development with ZebOS.
There is a great overview of OcNOS from Networking Field Day 15 here:
What does a production OcNOS based MPLS network look like?
Here is an overview of the EVE-NG lab we built based on an actual implementation.
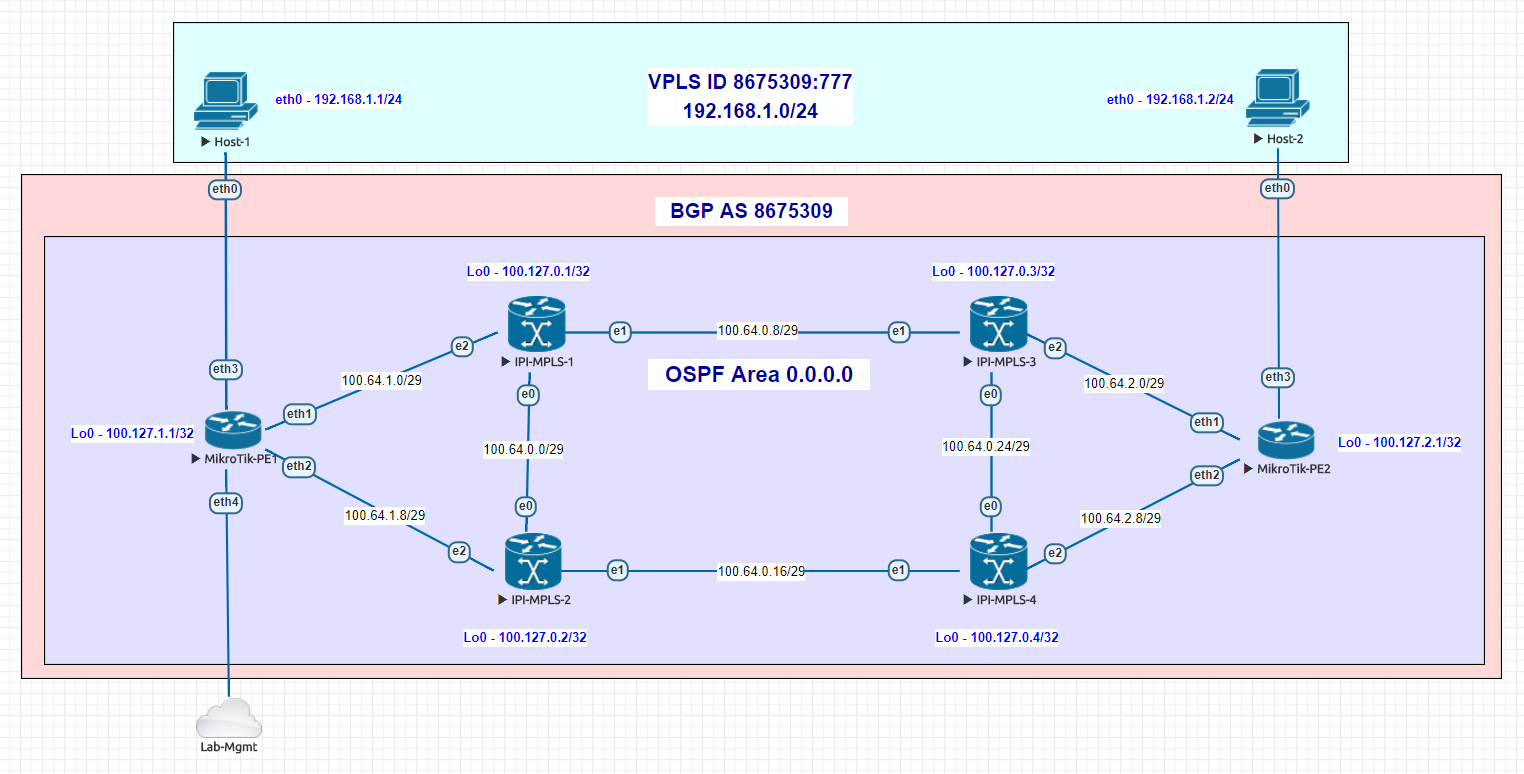
Use case – Building an MPLS core to deliver L2 overlay services
Although certainly not a new use case or implementation, MPLS and VPLS are very expensive to deploy using major vendors and are still a fundamental requirement for most ISPs.
This is where IPI really shines as they have feature sets like MPLS FRR, TE and the newer Segment Routing for OSPF and IS-IS that can be used in a platform that is significantly cheaper than incumbent network vendors.
The cost difference is so large that often ISPs are able to buy switches with a higher overall port speeds than they could from a major vendor. This in turn creates a significant competitive advantage as ISPs can take the same budget (or less) and roll out 100 gig instead of 10 gig – as an example
Unlike enterprise networks, cost is more consistently a significant driver when selecting network equipment for ISPs. This is especially true for startup ISPs that may be limited in the amount of capital that can be spent in a service area to keep ROI numbers relatively sane for investors.
Lab Overview
In the lab (and production) network we have above, OcNOS is deployed as the MPLS core at each data center and MikroTik routers are being used as MPLS PE routers.
VPLS is being run from one DC to the other and delivered via the PE routers to the end hosts.
Because the port density on whitebox switches is so high compared to a traditional aggregation router, we could even use LACP channels if dark fiber was available to increase the transport bandwidth between the DCs without a significant monetary impact on the cost of the deployment.
The type of switches that you’d use in production depend greatly on the speeds and feeds required, but for startup ISPs, we’ve had lots of success with Dell 4048s and Edge-Core 5812.
How hard is it to configure and deploy?
It’s not hard at all!
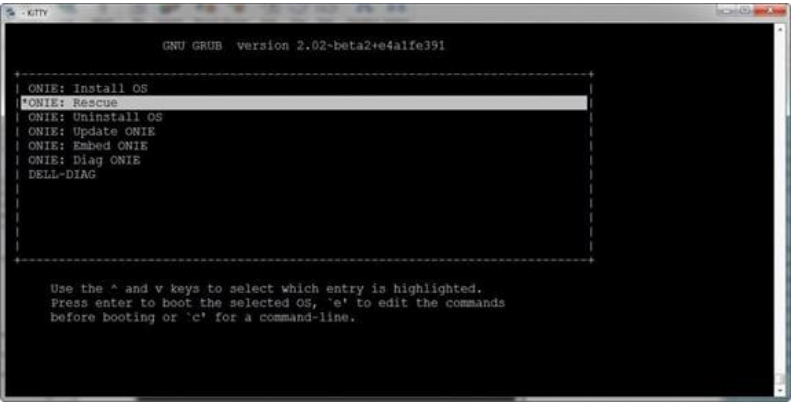
If you know how to use the up and down arrow keys in the bootloader and TFTP/FTP to load an image onto a piece of network hardware, you’re halfway there!
Here is a screenshot of the GRUB bootloader for an ONIE switch (this is a Dell) where you select which OS to boot the switch into
The configuration is relatively straightforward as well if you’re familiar with industry standard Command Line Interfaces (CLI).
While this lab was configured in a more traditional way using a terminal session to paste commands in, OcNOS can easily be orchestrated and automated using tools like Ansible (also presenting at Networking Field Day 18) or protocols like NETCONF as well as a REST API.
Lab configs
I’ve included the configs from the lab in order to give engineers a better idea of what OcNOS actually looks like for a production deployment.
IPI-MPLS-1
!
!Last configuration change at 12:24:27 EDT Tue Jul 17 2018 by ocnos
!
no service password-encryption
!
hostname IPI-MPLS-1
!
logging monitor 7
!
ip vrf management
!
mpls lsp-model uniform
mpls propagate-ttl
!
ip domain-lookup
spanning-tree mode provider-rstp
data-center-bridging enable
feature telnet
feature ssh
snmp-server enable snmp
snmp-server view all .1 included
ntp enable
username ocnos role network-admin password encrypted $1$HJDzvHS1$.4/PPuAmCUEwEhs
UWeYqo0
!
ip pim register-rp-reachability
!
router ldp
 router-id 100.127.0.1
!
interface lo
 mtu 65536
 ip address 127.0.0.1/8
 ip address 100.127.0.1/32 secondary
 ipv6 address ::1/128
!
interface eth0
 ip address 100.64.0.1/29
 label-switching
 enable-ldp ipv4
!
interface eth1
 ip address 100.64.0.9/29
 label-switching
 enable-ldp ipv4
!
interface eth2
 ip address 100.64.1.1/29
 label-switching
 enable-ldp ipv4
!
interface eth3
!
interface eth4
!
interface eth5
!
interface eth6
!
interface eth7
!
router ospf 1
 ospf router-id 100.127.0.1
 network 100.64.0.0/29 area 0.0.0.0
 network 100.64.0.8/29 area 0.0.0.0
 network 100.64.1.0/29 area 0.0.0.0
 network 100.127.0.1/32 area 0.0.0.0
 cspf disable-better-protection
!
bgp extended-asn-cap
!
router bgp 8675309
 bgp router-id 100.127.0.1
 neighbor 100.127.0.3 remote-as 8675309
 neighbor 100.127.0.3 update-source lo
 neighbor 100.127.2.1 remote-as 8675309
 neighbor 100.127.2.1 update-source lo
 neighbor 100.127.2.1 route-reflector-client
 neighbor 100.127.0.4 remote-as 8675309
 neighbor 100.127.0.4 update-source lo
 neighbor 100.127.0.4 route-reflector-client
 neighbor 100.127.0.2 remote-as 8675309
 neighbor 100.127.0.2 update-source lo
 neighbor 100.127.0.2 route-reflector-client
 neighbor 100.127.1.1 remote-as 8675309
 neighbor 100.127.1.1 update-source lo
 neighbor 100.127.1.1 route-reflector-client
!
line con 0
 login
line vty 0 39
 login
!
end
IPI-MPLS-2
!
!Last configuration change at 12:23:31 EDT Tue Jul 17 2018 by ocnos
!
no service password-encryption
!
hostname IPI-MPLS-2
!
logging monitor 7
!
ip vrf management
!
mpls lsp-model uniform
mpls propagate-ttl
!
ip domain-lookup
spanning-tree mode provider-rstp
data-center-bridging enable
feature telnet
feature ssh
snmp-server enable snmp
snmp-server view all .1 included
ntp enable
username ocnos role network-admin password encrypted $1$RWk6XAN.$6H0GXBR9ad8eJE2
7nRUfu1
!
ip pim register-rp-reachability
!
router ldp
 router-id 100.127.0.2
!
interface lo
 mtu 65536
 ip address 127.0.0.1/8
 ip address 100.127.0.2/32 secondary
 ipv6 address ::1/128
!
interface eth0
 ip address 100.64.0.2/29
 label-switching
 enable-ldp ipv4
!
interface eth1
 ip address 100.64.0.17/29
 label-switching
 enable-ldp ipv4
!
interface eth2
 ip address 100.64.1.9/29
 label-switching
 enable-ldp ipv4
!
interface eth3
!
interface eth4
!
interface eth5
!
interface eth6
!
interface eth7
!
router ospf 1
 network 100.64.0.0/29 area 0.0.0.0
 network 100.64.0.16/29 area 0.0.0.0
 network 100.64.1.8/29 area 0.0.0.0
 network 100.127.0.2/32 area 0.0.0.0
 cspf disable-better-protection
!
bgp extended-asn-cap
!
router bgp 8675309
 bgp router-id 100.127.0.2
 neighbor 100.127.0.3 remote-as 8675309
 neighbor 100.127.0.3 update-source lo
 neighbor 100.127.0.1 remote-as 8675309
 neighbor 100.127.0.1 update-source lo
!
line con 0
 login
line vty 0 39
 login
!
end
IPI-MPLS-3
!
!Last configuration change at 12:25:11 EDT Tue Jul 17 2018 by ocnos
!
no service password-encryption
!
hostname IPI-MPLS-3
!
logging monitor 7
!
ip vrf management
!
mpls lsp-model uniform
mpls propagate-ttl
!
ip domain-lookup
spanning-tree mode provider-rstp
data-center-bridging enable
feature telnet
feature ssh
snmp-server enable snmp
snmp-server view all .1 included
ntp enable
username ocnos role network-admin password encrypted $1$gc9xYbW/$JlCDmgAEzcCmz77
QwmJW/1
!
ip pim register-rp-reachability
!
router ldp
 router-id 100.127.0.3
!
interface lo
 mtu 65536
 ip address 127.0.0.1/8
 ip address 100.127.0.3/32 secondary
 ipv6 address ::1/128
!
interface eth0
 ip address 100.64.0.25/29
 label-switching
 enable-ldp ipv4
!
interface eth1
 ip address 100.64.0.10/29
 label-switching
 enable-ldp ipv4
!
interface eth2
 ip address 100.64.2.1/29
 label-switching
 enable-ldp ipv4
!
interface eth3
!
interface eth4
!
interface eth5
!
interface eth6
!
interface eth7
!
router ospf 1
 ospf router-id 100.127.0.3
 network 100.64.0.8/29 area 0.0.0.0
 network 100.64.0.24/29 area 0.0.0.0
 network 100.64.2.0/29 area 0.0.0.0
 network 100.127.0.3/32 area 0.0.0.0
 cspf disable-better-protection
!
bgp extended-asn-cap
!
router bgp 8675309
 bgp router-id 100.127.0.3
 neighbor 100.127.0.1 remote-as 8675309
 neighbor 100.127.0.1 update-source lo
 neighbor 100.127.2.1 remote-as 8675309
 neighbor 100.127.2.1 update-source lo
 neighbor 100.127.2.1 route-reflector-client
 neighbor 100.127.0.4 remote-as 8675309
 neighbor 100.127.0.4 update-source lo
 neighbor 100.127.0.4 route-reflector-client
 neighbor 100.127.0.2 remote-as 8675309
 neighbor 100.127.0.2 update-source lo
 neighbor 100.127.0.2 route-reflector-client
 neighbor 100.127.1.1 remote-as 8675309
 neighbor 100.127.1.1 update-source lo
 neighbor 100.127.1.1 route-reflector-client
!
line con 0
 login
line vty 0 39
 login
!
end
IPI-MPLS-4
!
!Last configuration change at 12:24:49 EDT Tue Jul 17 2018 by ocnos
!
no service password-encryption
!
hostname IPI-MPLS-4
!
logging monitor 7
!
ip vrf management
!
mpls lsp-model uniform
mpls propagate-ttl
!
ip domain-lookup
spanning-tree mode provider-rstp
data-center-bridging enable
feature telnet
feature ssh
snmp-server enable snmp
snmp-server view all .1 included
ntp enable
username ocnos role network-admin password encrypted $1$6OP7UdH/$RaIxCBOGxHIt1Ao
IUyPks/
!
ip pim register-rp-reachability
!
router ldp
 router-id 100.127.0.4
!
interface lo
 mtu 65536
 ip address 127.0.0.1/8
 ip address 100.127.0.4/32 secondary
 ipv6 address ::1/128
!
interface eth0
 ip address 100.64.0.26/29
 label-switching
 enable-ldp ipv4
!
interface eth1
 ip address 100.64.0.18/29
 label-switching
 enable-ldp ipv4
!
interface eth2
 ip address 100.64.2.9/29
 label-switching
 enable-ldp ipv4
!
interface eth3
!
interface eth4
!
interface eth5
!
interface eth6
!
interface eth7
!
router ospf 1
 ospf router-id 100.127.0.4
 network 100.64.0.16/29 area 0.0.0.0
 network 100.64.0.24/29 area 0.0.0.0
 network 100.64.2.8/29 area 0.0.0.0
 network 100.127.0.4/32 area 0.0.0.0
 cspf disable-better-protection
!
bgp extended-asn-cap
!
router bgp 8675309
 bgp router-id 100.127.0.4
 neighbor 100.127.0.3 remote-as 8675309
 neighbor 100.127.0.3 update-source lo
 neighbor 100.127.0.1 remote-as 8675309
 neighbor 100.127.0.1 update-source lo
!
line con 0
 login
line vty 0 39
 login
!
end
MikroTik PE-1
# jul/17/2018 17:33:30 by RouterOS 6.38.7
# software id =
#
/interface bridge
add name=Lo0
add name=bridge-vpls-777
/interface vpls
add disabled=no l2mtu=1500 mac-address=02:BF:0A:4A:55:D0 name=vpls777
    pw-type=tagged-ethernet remote-peer=100.127.2.1 vpls-id=8675309:777
/interface vlan
add interface=vpls777 name=vlan777 vlan-id=777
/interface wireless security-profiles
set [ find default=yes ] supplicant-identity=MikroTik
/routing bgp instance
set default as=8675309 router-id=100.127.1.1
/routing ospf instance
set [ find default=yes ] router-id=100.127.1.1
/interface bridge port
add bridge=bridge-vpls-777 interface=ether3
add bridge=bridge-vpls-777 interface=vlan777
/ip address
add address=100.64.1.2/29 interface=ether1 network=100.64.1.0
add address=100.127.1.1 interface=Lo0 network=100.127.1.1
add address=100.64.1.10/29 interface=ether2 network=100.64.1.8
/ip dhcp-client
add disabled=no interface=ether4
/mpls ldp
set enabled=yes lsr-id=100.127.1.1 transport-address=100.127.1.1
/mpls ldp interface
add interface=ether1 transport-address=100.127.1.1
add interface=ether2 transport-address=100.127.1.1
/routing bgp peer
add name=IPI-MPLS-1 remote-address=100.127.0.1 remote-as=8675309
    update-source=Lo0
add name=IPI-MPLS-3 remote-address=100.127.0.3 remote-as=8675309
    update-source=Lo0
/routing ospf network
add area=backbone network=100.64.1.0/29
add area=backbone network=100.64.1.8/29
add area=backbone network=100.127.1.1/32
/system identity
set name=MIkroTik-PE1
/tool romon
set enabled=yes
MikroTik PE-2
# jul/17/2018 17:34:23 by RouterOS 6.38.7
# software id =
#
/interface bridge
add name=Lo0
add name=bridge-vpls-777
/interface vpls
add disabled=no l2mtu=1500 mac-address=02:E2:86:F2:23:21 name=vpls777 pw-type=tagged-ethernet remote-peer=100.127.1.1 vpls-id=8675309:777
/interface vlan
add interface=vpls777 name=vlan777 vlan-id=777
/interface wireless security-profiles
set [ find default=yes ] supplicant-identity=MikroTik
/routing bgp instance
set default as=8675309 router-id=100.127.2.1
/routing ospf instance
set [ find default=yes ] router-id=100.127.2.1
/interface bridge port
add bridge=bridge-vpls-777 interface=ether3
add bridge=bridge-vpls-777 interface=vlan777
/ip address
add address=100.64.2.2/29 interface=ether1 network=100.64.2.0
add address=100.127.2.1 interface=Lo0 network=100.127.2.1
add address=100.64.2.10/29 interface=ether2 network=100.64.2.8
/ip dhcp-client
add disabled=no interface=ether1
/mpls ldp
set enabled=yes lsr-id=100.127.2.1 transport-address=100.127.2.1
/mpls ldp interface
add interface=ether1 transport-address=100.127.2.1
add interface=ether2 transport-address=100.127.2.1
/routing bgp peer
add name=IPI-MPLS-1 remote-address=100.127.0.1 remote-as=8675309 update-source=Lo0
add name=IPI-MPLS-3 remote-address=100.127.0.3 remote-as=8675309 update-source=Lo0
/routing ospf network
add area=backbone network=100.64.2.0/29
add area=backbone network=100.64.2.8/29
add area=backbone network=100.127.2.1/32
/system identity
set name=MIkroTik-PE2
/tool bandwidth-server
set authenticate=no
/tool romon
set enabled=yes