It has been a busy week and we have been working hard on CCR1072 testing. The full review for BGP Performance is still a few days away, but here is a sneak preview of some of the testing in the stubarea51 Lab.
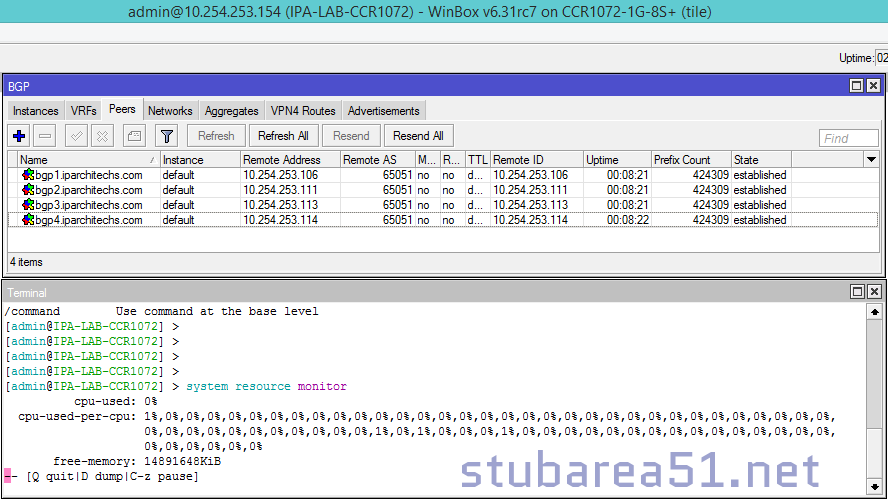
We put just under 1.7 Million routes across 4 BGP peers into the CCR1072-1G-8S+ and it was fully converged in 2 Minutes and 42 seconds.
Here is a screen shot of the CCR1072-1G-8S+ after converging with 4 full feeds.
NOTE: The pictures in this review are of a pre-production CCR1072. The CCR1072 that is shipping has some minor differences on the mainboard and the case. MikroTik is sending updated pictures and we will post those as soon as they come in!
StubArea51.net prepares for CCR1072 performance testing in the Flowood, MS lab
Well, the long wait is finally over. According to Tom over at www.roc-noc.com, the CCR1072 will start shipping in the next 2 weeks and we will be adding it to our development lab in Flowood, MS. We were fortunate enough to get a significant amount of time with the new flagship router down in Miami at the 2015 USA MUM thanks to MT. The arrival of the CCR1072 and 80 Gbps of throughput opens up new doors for MikroTik. The CCR1072 positions MikroTik to break into larger markets and enables competition against industry players like Cisco and Juniper.
This review will be divided into three separate posts (this is Part 1):
Hardware/Specs
Throughput testing/performance
BGP peer load testing.
The first section will focus on the design, hardware specifications and use cases. We will have a CCR1072 in the Stub Area 51 lab very shortly and will be connecting it to our 10 Gbps capable ESXi servers to provide TCP/UDP performance metrics on IPv4 and IPv6. We will also be testing the BGP Peering capability of the CCR1072 by connecting it to our service provider lab and sending multiple full feeds simultaneously to see how it handles the load.
Raw Specs and product description
Let’s take a look at the numbers and product description from MikroTik:
CCR1072-1G-8S+ is an industrial grade super fast router with cutting edge 72 core CPU. If you need many millions of packets per second – Cloud Core Router is your best choice.
72 core networking CPU, 1 GHz clock per core
16GB ECC RAM
State of the art TILE GX architecture
8x SFP+ ports for 10 Gigabit connectivity
Ports directly connected to CPU
Up to 80 Gbps throughput
Over 100 million pps packet throughput
1U rackmount case
Color touchscreen LCD display
Two hot-swap power supplies for redundancy
MicroSD and 2x USB
Two M.2 slots accept 800mm Key-M x4 PCIe 2.0 modules
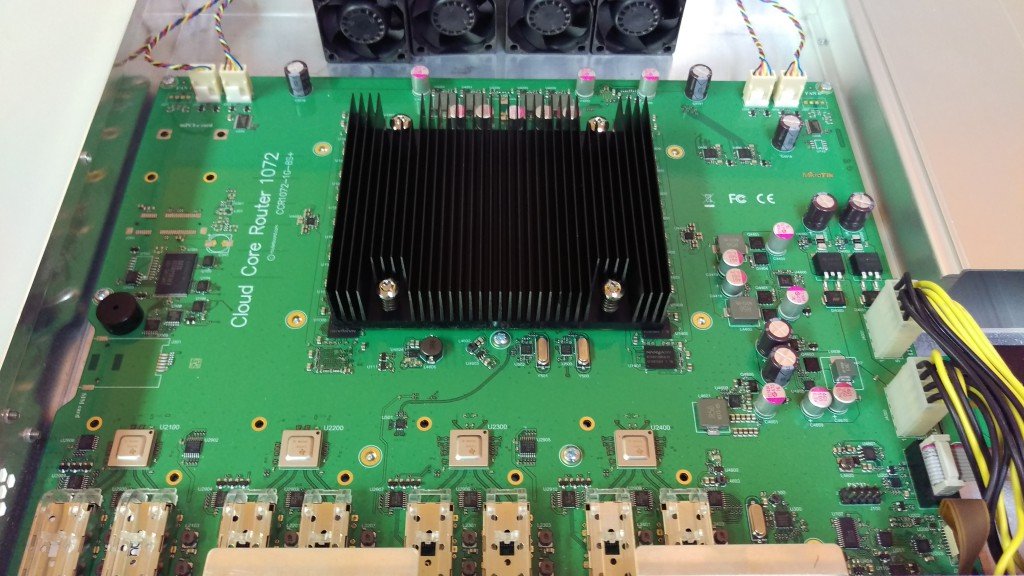
Under the hood
With the air channel installed for the quad fan assembly
With the air channel removed and the looking at the CPU heat sink
Power redundancy
One trend that I hope MikroTik continues across the rack mount product line is the option of dual power supplies like on the CCR1009. This has been a long awaited feature on MikroTik routers and it helps to position MikroTik into segments it has struggled to gain a foothold on like enterprise and data center networking.
72 Cores for 80Gbps+ worth of Interwebs!
A look inside the heart of the beast at the 72 Core Tilera gx8072 processor.
Mikrotik’s published speed numbers for the CCR1072 are 80 Gbps, but if you read the Tilera specs, it is capable of 100 Gbps of throughput. The 80 Gbps rating appears to come from the 8 x 10 Gig interfaces connected to the mPIPE. It would be interesting to see if any more 10 gig interfaces could be added via the PCIe slots.
Service Provider – A number of ideas come to mind for ISPs – This could be used in the core / distribution with BGP/OSPF/MPLS, although it may not be the most efficient router to use to terminate public BGP until the router can process the tables more quickly. This would also make a great PE for a larger MPLS network that needs more resources on the PE. We will be testing the CCR1072 with multiple full feeds to see how well it handles them.
Data Center – This could easily be the Layer 3 core of even a medium size data center and certainly those renting a partial rack of COLO space. InterVLAN routing at 80 Gbps easily exceeds the needs of all but the big data operators. These could also be used for throughput to IP based storage like NFS or iSCSI. There is a trend in Data Center design towards moving dynamic routing down to the end host and the 1072 could be positioned as a TOR (Top of Rack) or EOR (End of Row) L3 routing point.
High throughput L4-L7 Firewall – When used as a firewall deployed at Layer 2 or 3, this router can move a large amount of data through its stateful firewall. Considering the Cisco 5585x starts at 20 gig of throughput and is typically approaching $100,000 to deploy, this could be a game changer in the firewall world at just under $3K per box.
High Performance IPv4 / IPv6 Proxy / Web Cache – The SD slot opens up some great possibilities to build a high performance web proxy with caching. Throw in some Layer7 rules and you have a very economical IPv4 / IPv6 dual stack capable proxy capable of pushing traffic way beyond the capacity of most Internet pipes.
Enterprise – When coupled with the right 10 gig switch, the CCR1072 is well suited to run an Enterprise campus and handle converged Data, Voice and Video. The 1072 is ideal for a core or distribution layer in the Enterprise.
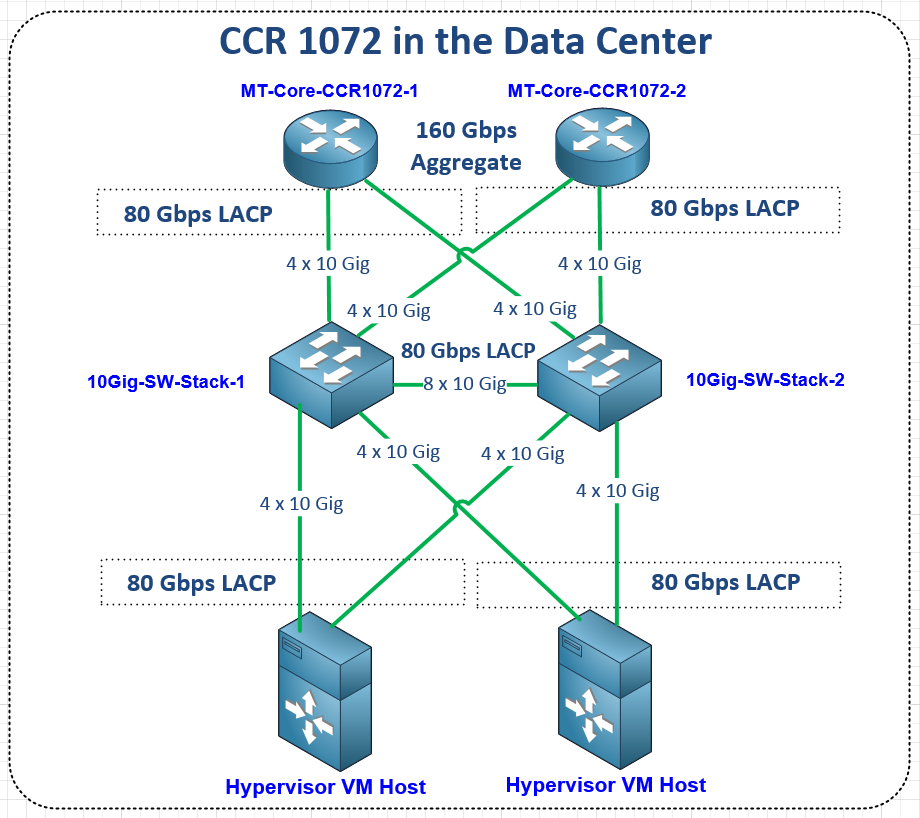
Design Example – Data Center CCR1072 implementation
This is a design adapted from an initial Data Center buildout we labbed and presented at the US 2014 MUM on achieving HA and high throughput with a CCR 1036-8G-2S+ as the Layer 3 core in a Data Center. We have taken and adapted many of the design principles of that network and updated the design with the CCR1072.
The original design was built using CCR1036-8G-2S+ and used 20 Gig LACP channels to achieve 40 Gbps of aggregate throughput using ECMP with OSPF/BGP. Now that the CCR1072 has been released, we can increase the aggregate throughput to 160 Gbps between two routers and 320Gbps using four routers.
Coming next – MikroTik CCR1072-1G-8S+ Review (Part 2 ) BGP Performance testing using multiple peers with full BGP tables.