Juniper to MikroTik – MPLS and VPNv4 interop

Juniper to MikroTik – a new series

Previously, I’ve written a number of articles that compared syntax between Cisco and MikroTik and have received some great feedback on them.

As such, I decided to begin a series on Juniper to MikroTik starting with MPLS and L3VPN interop as it related to a project I was working on last year.

In the world of network engineering, learning a new syntax for a NOS can be overwhelming if you need a specific set of config in a short timeframe. The command structure for RouterOS can be a bit challenging if you are used to Juniper CLI commands.

If you’ve worked with Juniper gear and are comfortable with how to deploy that vendor, it is helpful to draw comparisons between the commands, especially if you are trying to build a network with a MikroTik and Juniper router.

Lab Overview

The lab consists of (3) Juniper P routers and (2) MikroTik PE routers. Although we did not get into L3VPN in this particular lab, the layout is the same.

A note on route-targets

It seems that the format of the route-target has some bearing on this being successful. Normally i’ll use a format like 8675309:1 but in this case, I had some interop issues with making that work so we used dotted decimal.

Some of the results when searching seem to suggest that platforms like Juniper and Cisco reverse the RT string in the packet while MikroTik uses it in sequential order

To work around that, the format we used was the same forwards and backwards – 1.1.1.1:1

MPLS and VPNv4 use case

MPLS is often used in service provider and data center networks to provide multi-tenancy.

VPNv4 specifically allows for separate routing tables to be created (VRFs) and advertised via BGP using the VPNv4 address family.

This address family relies on MPLS to assign a VPN label and route target as an extended community to the route which keeps it isolated from routes in other VRFs.

Practical Use

Many service provider networks rely on Juniper for the edge and core roles.

However, increasingly, ISPs want to save money on last mile and smaller aggregation points.

MikroTik is an effective choice for more simplistic MPLS capabilities as it’s inexpensive and interops with Juniper.

This creates a variety of low cost deployment options as a manged CE router, GPON aggregation in the last mile, managed CE for enterprise customers….and so on.

Command comparison

Juniper commandMikroTik Command
> show ldp neighbormpls ldp neighbor print
> show mpls interfacempls ldp interface print
> show route table mpls.0mpls forwarding-table print
> show ldp databasempls remote-bindings print
> show ldp databasempls local-bindings print
> show mpls label usage label-rangempls print
> show ldp overviewmpls ldp print
# set interfaces ge-0/0/0 unit 0 family mpls
# set protocols mpls interface ge-0/0/0.0
# set protocols ldp interface ge-0/0/0.0
/mpls ldp interface
add interface=ether1
{ inherited from loopback }/mpls ldp
set enabled=yes lsr-id=10.1.1.3

Testing connectivity

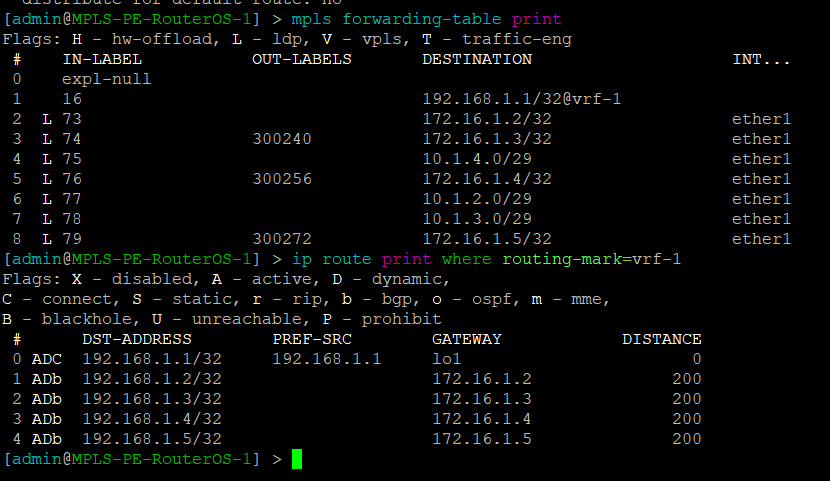
MikroTik – mpls forwarding table and vrf routes
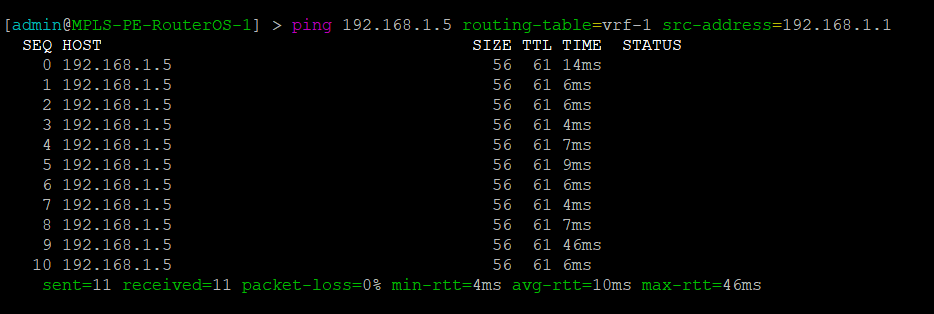
MikroTik – Ping PE2 through Juniper MPLS network
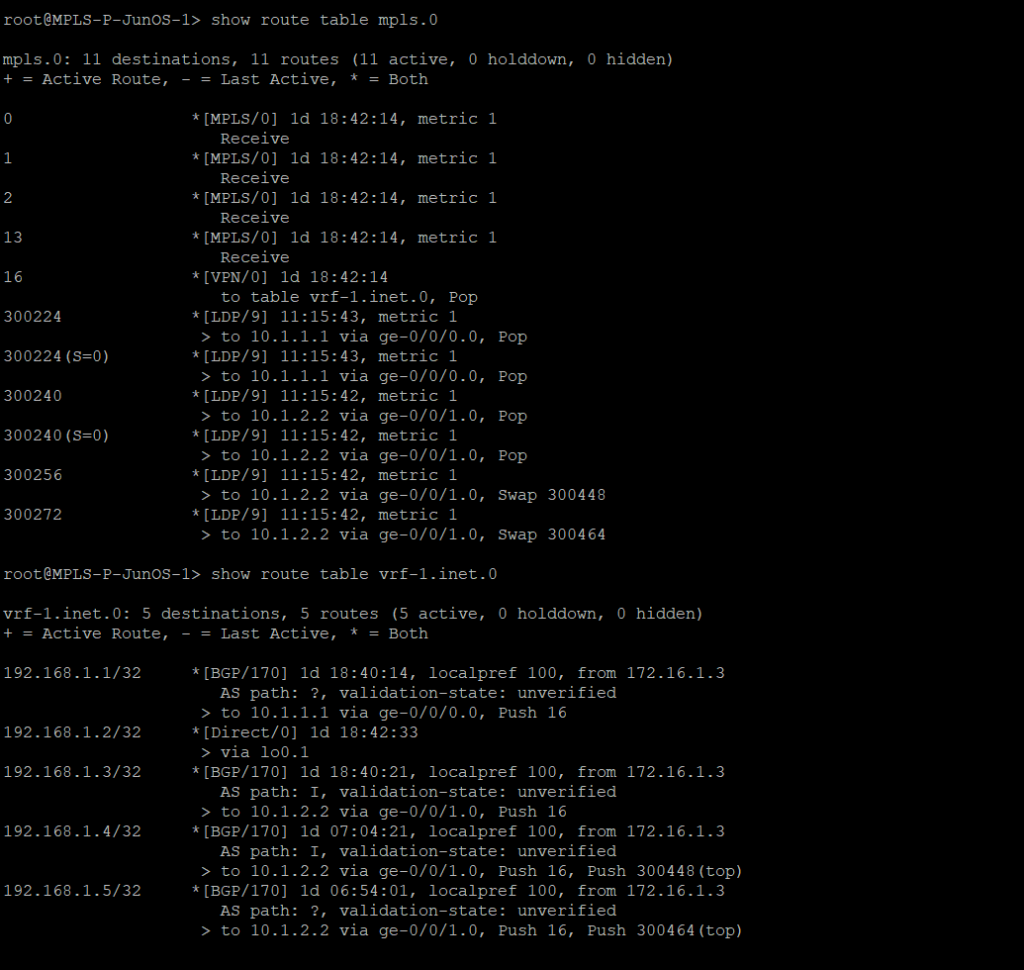
Juniper – mpls forwarding table and vrf routes
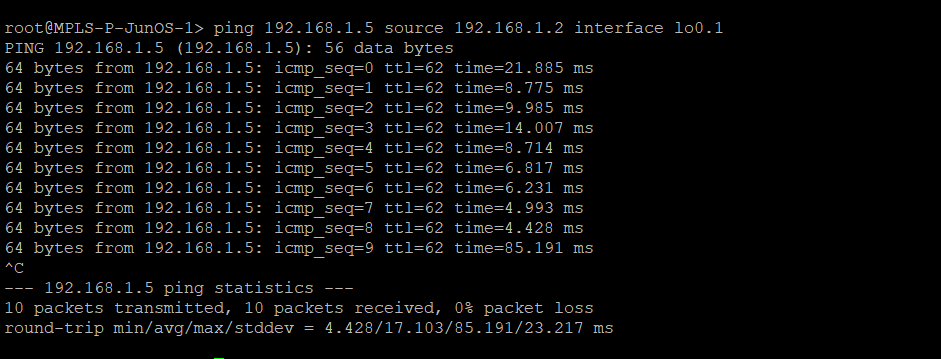
Juniper – Ping PE2 from Juniper MPLS network
Router configs

MPLS-PE-RouterOS-1

/interface bridge
 add name=lo0
 add name=lo1
 /interface wireless security-profiles
 set [ find default=yes ] supplicant-identity=MikroTik
 /routing bgp instance
 set default as=8675309
 /ip address
 add address=10.1.1.1/29 interface=ether1 network=10.1.1.0
 add address=192.168.1.1 interface=lo1 network=192.168.1.1
 add address=172.16.1.1 interface=lo0 network=172.16.1.1
 /ip dhcp-client
 add disabled=no interface=ether1
 /ip route vrf
 add export-route-targets=1.1.1.1:1 import-route-targets=1.1.1.1:1 interfaces=\
     lo1 route-distinguisher=1.1.1.1:1 routing-mark=vrf-1
 /mpls ldp
 set enabled=yes lsr-id=172.16.1.1 transport-address=172.16.1.1
 /mpls ldp interface
 add interface=ether1
 /routing bgp instance vrf
 add redistribute-connected=yes routing-mark=vrf-1
 /routing bgp peer
 add address-families=ip,vpnv4 name=peer1 remote-address=172.16.1.3 remote-as=\
     8675309 update-source=lo0
 /routing ospf network
 add area=backbone network=10.1.1.0/29
 add area=backbone network=172.16.1.1/32
 /system identity
 set name=MPLS-PE-RouterOS-1
 

MPLS-PE-RouterOS-2

/interface bridge
 add name=lo0
 add name=lo1
 /interface wireless security-profiles
 set [ find default=yes ] supplicant-identity=MikroTik
 /routing bgp instance
 set default as=8675309
 /ip address
 add address=10.1.4.2/29 interface=ether1 network=10.1.4.0
 add address=192.168.1.5 interface=lo1 network=192.168.1.5
 add address=172.16.1.5 interface=lo0 network=172.16.1.5
 /ip dhcp-client
 add disabled=no interface=ether1
 /ip route vrf
 add export-route-targets=1.1.1.1:1 import-route-targets=1.1.1.1:1 interfaces=lo1 route-distinguisher=1.1.1.1:1 routing-mark=vrf-1
 /mpls ldp
 set enabled=yes lsr-id=172.16.1.5 transport-address=172.16.1.5
 /mpls ldp interface
 add interface=ether1
 /routing bgp instance vrf
 add redistribute-connected=yes routing-mark=vrf-1
 /routing bgp peer
 add address-families=ip,vpnv4 name=peer1 remote-address=172.16.1.3 remote-as=8675309 update-source=lo0
 /routing ospf network
 add area=backbone network=10.1.4.0/29
 add area=backbone network=172.16.1.5/32
 /system identity
 set name=MPLS-PE-RouterOS-2

MPLS-P-JunOS-1

version 14.1R1.10;
 system {
     host-name MPLS-P-JunOS-1;
     root-authentication {
         encrypted-password "$1$kj9Pva8c$R0knN0l873H.UaBUUNYA00"; ## SECRET-DATA
     }
     syslog {
         user * {
             any emergency;
         }
         file messages {
             any notice;
             authorization info;
         }
         file interactive-commands {
             interactive-commands any;
         }
     }
 }
 interfaces {
     ge-0/0/0 {
         unit 0 {
             family inet {
                 address 10.1.1.2/29;
             }
             family mpls;
         }
     }
     ge-0/0/1 {
         unit 0 {
             family inet {
                 address 10.1.2.1/29;
             }
             family mpls;
         }
     }
     lo0 {
         unit 0 {
             family inet {
                 address 172.16.1.2/32;
             }
         }
         unit 1 {
             family inet {
                 address 192.168.1.2/32;
             }
         }
     }
 }
 routing-options {
     router-id 172.16.1.2;
     route-distinguisher-id 172.16.1.2;
     autonomous-system 8675309;
 }
 protocols {
     mpls {
         traffic-engineering mpls-forwarding;
         interface ge-0/0/0.0;
         interface ge-0/0/1.0;
     }
     bgp {
         group rr {
             type internal;
             local-address 172.16.1.2;
             family inet-vpn {
                 unicast;
             }
             neighbor 172.16.1.3 {
                 peer-as 8675309;
             }
         }
     }
     ospf {
         traffic-engineering;
         area 0.0.0.0 {
             interface ge-0/0/0.0;
             interface ge-0/0/1.0;
             interface lo0.0;
         }
     }
     ldp {
         interface ge-0/0/0.0;
         interface ge-0/0/1.0;
     }
 }
 routing-instances {
     vrf-1 {
         instance-type vrf;
         interface lo0.1;
         route-distinguisher 1.1.1.1:1;
         vrf-target target:1.1.1.1:1;
         vrf-table-label;
     }
 }
MPLS-P-JunOS-2

version 14.1R1.10;
 system {
     host-name MPLS-P-JunOS-2;
     root-authentication {
         encrypted-password "$1$g6tJMNPd$f35BMnnPgit/YLshrXd/L1"; ## SECRET-DATA
     }
     services {
         ssh;
     }
     syslog {
         user * {
             any emergency;
         }
         file messages {
             any notice;
             authorization info;
         }
         file interactive-commands {
             interactive-commands any;
         }
     }
 }
 interfaces {
     ge-0/0/0 {
         unit 0 {
             family inet {
                 address 10.1.2.2/29;
             }
             family mpls;
         }
     }
     ge-0/0/1 {
         unit 0 {
             family inet {
                 address 10.1.3.1/29;
             }
             family mpls;
         }
     }
     lo0 {
         unit 0 {
             family inet {
                 address 172.16.1.3/32;
             }
         }
         unit 1 {
             family inet {
                 address 192.168.1.3/32;
             }
         }
     }
 }
 routing-options {
     router-id 172.16.1.3;
     route-distinguisher-id 172.16.1.3;
     autonomous-system 8675309;
 }
 protocols {
     mpls {
         traffic-engineering mpls-forwarding;
         interface ge-0/0/0.0;
         interface ge-0/0/1.0;
     }
     bgp {
         group rr {
             type internal;
             local-address 172.16.1.3;
             family inet-vpn {
                 unicast;
             }
             cluster 1.1.1.1;
             neighbor 172.16.1.2 {
                 peer-as 8675309;
             }
             neighbor 172.16.1.1 {
                 peer-as 8675309;
             }
             neighbor 172.16.1.3 {
                 peer-as 8675309;
             }
             neighbor 172.16.1.4 {
                 peer-as 8675309;
             }
             neighbor 172.16.1.5 {
                 peer-as 8675309;
             }
         }
     }
     ospf {
         traffic-engineering;
         area 0.0.0.0 {
             interface ge-0/0/0.0;
             interface ge-0/0/1.0;
             interface lo0.0;
         }
     }
     ldp {
         interface ge-0/0/0.0;
         interface ge-0/0/1.0;
     }
 }
 policy-options {
     policy-statement import-vrf1 {
         term import-term-connected {
             from protocol direct;
             then accept;
         }
         term term-reject {
             then reject;
         }
     }
 }
 routing-instances {
     vrf-1 {
         instance-type vrf;
         interface lo0.1;
         route-distinguisher 1.1.1.1:1;
         vrf-target target:1.1.1.1:1;
         vrf-table-label;
     }
 }

MPLS-P-JunOS-3

version 14.1R1.10;
 system {
     host-name MPLS-P-JunOS-3;
     root-authentication {
         encrypted-password "$1$kj9Pva8c$R0knN0l873H.UaBUUNYA00"; ## SECRET-DATA
     }
     syslog {
         user * {
             any emergency;
         }
         file messages {
             any notice;
             authorization info;
         }
         file interactive-commands {
             interactive-commands any;
         }
     }
 }
 interfaces {
     ge-0/0/0 {
         unit 0 {
             family inet {
                 address 10.1.3.2/29;
             }
             family mpls;
         }
     }
     ge-0/0/1 {
         unit 0 {
             family inet {
                 address 10.1.4.1/29;
             }
             family mpls;
         }
     }
     lo0 {
         unit 0 {
             family inet {
                 address 172.16.1.4/32;
             }
         }
         unit 1 {
             family inet {
                 address 192.168.1.4/32;
             }
         }
     }
 }
 routing-options {
     router-id 172.16.1.4;
     route-distinguisher-id 172.16.1.4;
     autonomous-system 8675309;
 }
 protocols {
     mpls {
         traffic-engineering mpls-forwarding;
         interface ge-0/0/0.0;
         interface ge-0/0/1.0;
     }
     bgp {
         group rr {
             type internal;
             local-address 172.16.1.4;
             family inet-vpn {
                 unicast;
             }
             neighbor 172.16.1.3 {
                 peer-as 8675309;
             }
         }
     }
     ospf {
         traffic-engineering;
         area 0.0.0.0 {
             interface ge-0/0/0.0;
             interface ge-0/0/1.0;
             interface lo0.0;
         }
     }
     ldp {
         interface ge-0/0/0.0;
         interface ge-0/0/1.0;
     }
 }
 routing-instances {
     vrf-1 {
         instance-type vrf;
         interface lo0.1;
         route-distinguisher 1.1.1.1:1;
         vrf-target target:1.1.1.1:1;
         vrf-table-label;
     }
 }
WISP Design – An overview of adding IPv6 to your WISP

The challenge of adding IPv6 to your WISP

IPv6 is one of those technologies that can feel pretty overwhelming, but it doesn’t have to be. Many of the same ideas and concepts learned in IPv4 networking still apply.

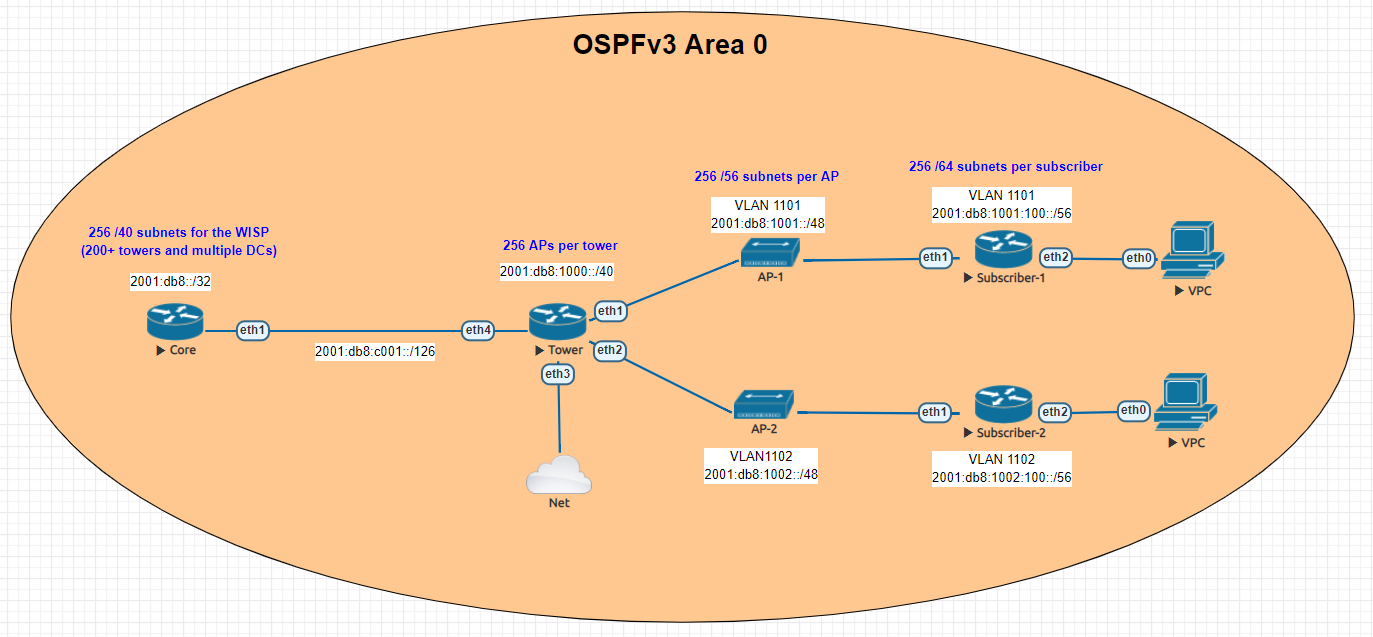
This guide is meant to give you an overview of an example IPv6 addressing plan for an entire WISP as well as the config needed in MikroTik to deploy IPv6 from a core router all the way to a subscriber device.

Benefits of adding IPv6

  • Public addressing for all subscribers – reduced need for NAT
  • Regulatory compliance – public addressing that is persistent makes it much easier to be compliant for things like CALEA
  • Reduced complaints from gamers – Xbox and Playstation both have IPv6 networks and prefer IPv6. This reduces complaints from customers who have gaming consoles that have detected an “improper” NAT configuration.
  • Increased security – IPv6, while not impervious to security threats makes it much harder for attackers to scan IPs due to the sheer size of the IP space. If using privacy extensions with SLAAC, it also makes it much harder to target someone online as the IP address seen on the internet changes randomly.
  • Improved real time communications – one way audio and video issues are often caused by NAT. Using end to end connectivity on public addressing improves the reliability of IP voice and video when used on IPv6
  • Web scale content (Netflix, Facebook, Google, etc) is IPv6 enabled which means a large portion of your traffic will shift to native IPv6 once dual stack is enabled.

IPv6 Addressing

One of the things i’ve learned about IPv6 is that addressing plans seem to spark epic debates about the waste of addresses and what size prefix an end subscriber should get.

Although this lab could have easily been done with a /56 at the tower and /53 at each AP, I decided to use RIPEs recommendations from their guide on IPv6 best operational practices.

This is mainly to keep the focus of the article on actually getting IPv6 deployed and not focusing on the addressing.

Dual Stack

For simplicity, the IPv4 config is not shown, but the recommended design for an operational WISP is to implement IPv4 and IPv6 side by side in a Dual Stack configuration.

Lab Overview

The lab is designed to illustrate most of the operational aspects of IPv6 in a WISP using MikroTik CHR routers in EVE-NG. This includes:

  • DHCPv6 and Prefix Delegation (PD)
  • OSPFv3 single area configuration and origination of a default route
  • Subscriber router example with SLAAC

Core Router

In the lab, the core router is shown directly connected to the tower for simplicity, in your WISP, there may be multiple towers between the core and the end of the network.

The concept, however is the same – use /126 addressing to connect towers for OSPFv3.

Note that OSPFv3 still requires a router-id in dotted decimal format, even though the address you put int doesn’t have to actually exist – for consistency however, use the IPv4 loopback of the router for the router id.

The internet connectivity isn’t shown in this lab, but your ISP will give you a /126 address to connect to your border router and either peer with BGP or the provider can route the /32 prefix to you.

Config

/interface wireless security-profiles
set [ find default=yes ] supplicant-identity=MikroTik
/routing ospf-v3 instance
set [ find default=yes ] distribute-default=always-as-type-1 router-id=\
    100.127.1.1
/ip dhcp-client
add disabled=no interface=ether1
/ipv6 address
add address=2001:db8:c001::1/126 advertise=no interface=ether1
/routing ospf-v3 interface
add area=backbone interface=ether1
/system identity
set name=Core
/tool romon
set enabled=yes

Tower Router

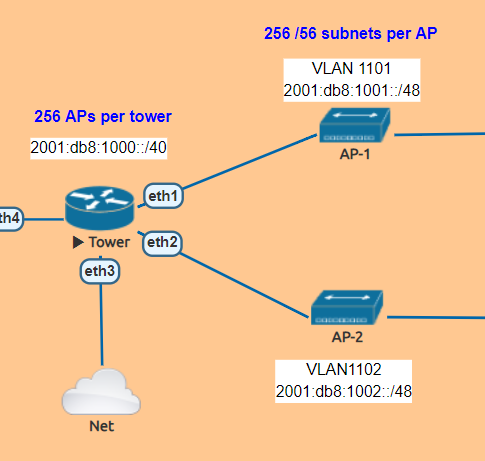
The tower router is handling most of the work as it is responsible for DHCPv6 and Prefix Delegation as well as advertising the /48 AP subnets into OSPF

In this lab , the APs are split into separate VLANs (with dual stack, IPv4 would exist on the same VLAN).

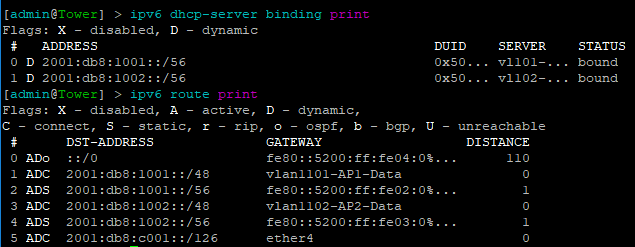
The router is configured to hand out /56 prefixes to the end subscriber using a pool of /48 per AP.

Because Prefix Delegation is being utilized, a dynamic static route is created for each /56 the DHCPv6 server hands out which eliminates the need to use a routing protocol.

Prefix Delegation in action

This example shows the prefixes allocated by the router and the dynamic static routes created

Config

/interface bridge
add name=Lo0
/interface vlan
add interface=ether1 name=vlan1101-AP1-Data vlan-id=1101
add interface=ether2 name=vlan1102-AP2-Data vlan-id=1102
/interface wireless security-profiles
set [ find default=yes ] supplicant-identity=MikroTik
/ipv6 dhcp-server
add address-pool=vl101-v6-pd-pool interface=vlan1101-AP1-Data name=\
    vl101-v6-pd
add address-pool=vl102-v6-pd-pool interface=vlan1102-AP2-Data name=\
    vl102-v6-pd
/ipv6 pool
add comment="VLAN1101 IPv6 prefix delegation pool" name=vl101-v6-pd-pool \
    prefix=2001:db8:1001::/48 prefix-length=56
add comment="VLAN1102 IPv6 prefix delegation pool" name=vl102-v6-pd-pool \
    prefix=2001:db8:1002::/48 prefix-length=56
/routing ospf-v3 instance
set [ find default=yes ] router-id=100.127.1.2
/ip dhcp-client
add disabled=no interface=ether1
/ipv6 address
add address=2001:db8:1001::1/48 advertise=no interface=vlan1101-AP1-Data
add address=2001:db8:1002::1/48 advertise=no interface=vlan1102-AP2-Data
add address=2001:db8:c001::2/126 advertise=no interface=ether4
/ipv6 nd
add interface=vlan1101-AP1-Data managed-address-configuration=yes \
    other-configuration=yes
add interface=vlan1102-AP2-Data managed-address-configuration=yes \
    other-configuration=yes
/ipv6 nd prefix
add autonomous=no interface=vlan1101-AP1-Data
add autonomous=no interface=vlan1102-AP2-Data
/routing ospf-v3 interface
add area=backbone interface=ether4
add area=backbone interface=vlan1101-AP1-Data
add area=backbone interface=vlan1102-AP2-Data
add area=backbone passive=yes
/system identity
set name=Tower
/tool romon
set enabled=yes

Subscriber Routers

For simplicity, MikroTik is used as the Subscriber or CPE router to provide an example of how the /56 prefix is received from the tower router and handed off to devices inside the subscriber’s home.

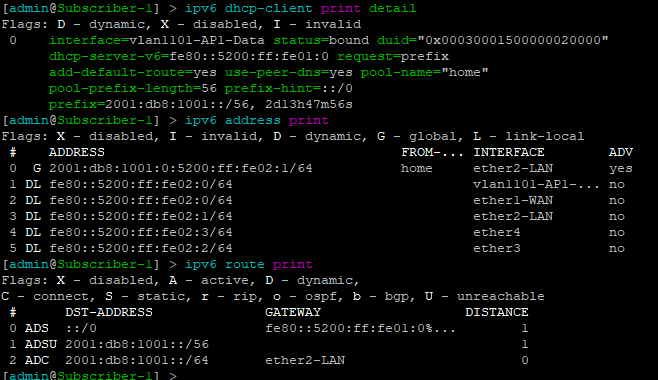
In this lab, the “WAN” interface or ether1 has a DHCPv6 client configured to receive the prefix from the tower router.

Ether2 or the “LAN” side, which would include a bridge of the the wireless/wired interfaces in a real router is configured with a dynamic /64 from the /56 pool and is set for SLAAC to give devices on this segment an IPv6 address.

DHCPv6 client and subscriber addresses/routes

Config – Subscriber 1

/interface ethernet
set [ find default-name=ether1 ] name=ether1-WAN
set [ find default-name=ether2 ] name=ether2-LAN
/interface vlan
add interface=ether1-WAN name=vlan1101-AP1-Data vlan-id=1101
/interface wireless security-profiles
set [ find default=yes ] supplicant-identity=MikroTik
/ip dhcp-client
add disabled=no interface=ether1-WAN
/ipv6 address
add eui-64=yes from-pool=home interface=ether2-LAN
/ipv6 dhcp-client
add add-default-route=yes interface=vlan1101-AP1-Data pool-name=home \
    pool-prefix-length=56 request=prefix
/ipv6 nd
add hop-limit=64 interface=ether2-LAN
/system identity
set name=Subscriber-1
/tool romon
set enabled=yes


Config – Subscriber 2

/interface ethernet
set [ find default-name=ether1 ] name=ether1-WAN
set [ find default-name=ether2 ] name=ether2-LAN
/interface vlan
add interface=ether1-WAN name=vlan1102-AP2-Data vlan-id=1102
/interface wireless security-profiles
set [ find default=yes ] supplicant-identity=MikroTik
/ip dhcp-client
add disabled=no interface=ether1-WAN
/ipv6 address
add eui-64=yes from-pool=home interface=ether2-LAN
/ipv6 dhcp-client
add add-default-route=yes interface=vlan1102-AP2-Data pool-name=home \
    pool-prefix-length=56 request=prefix
/ipv6 nd
add hop-limit=64 interface=ether2-LAN
/system identity
set name=Subscriber-2
/tool romon
set enabled=yes

Subscriber Device

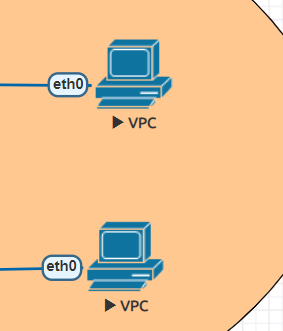
EVE-NG has a small Linux image that can be used as a host called VPC or virtual PC. This allows us to put a device on ether2 and test end to end reachability back to the core router.

SLAAC addressing example

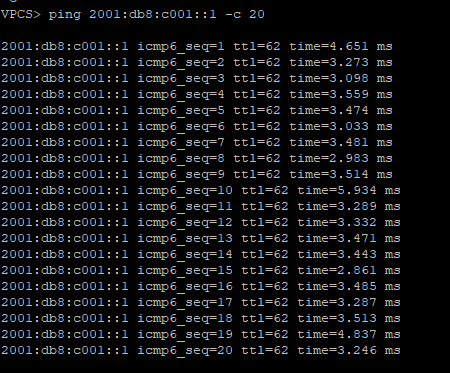
Ping test back to the core router

Success!!!!!!!!