About the Juniper to MikroTik Series
In the world of network engineering, learning a new syntax for a NOS can be daunting if you need a specific config quickly. Juniper is a popular option for service providers/data centers and is widely deployed across the world.
This is a continuation of the Rosetta stone for network operating systems series. In this portion of the series we will be covering Open Shortest Path First, OSPF, version 2 which is a popular interior gateway protocol (IGP).
You can find the first article of the series Juniper to Mikrotik – BGP Commands here.
While many commands have almost the exact same information, others are as close as possible. Since there isn’t always an exact match, sometimes you may have to run two or three commands to get the information needed.
Using EVE-NG for testing
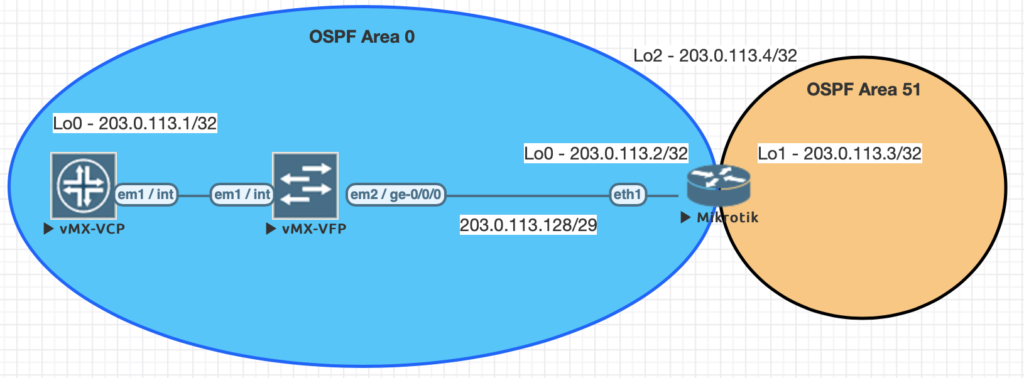
We conducted all testing on EVE-NG utilizing the topology seen below.
| JunOS Command | MikroTik Command |
|---|---|
| show ospf neighbor | routing ospf neighbor print |
| show ospf interface | routing ospf interface print |
| show ospf overview brief | routing ospf instance print detail |
| show ospf database | routing ospf lsa print |
| show route protocol ospf | ip route print where ospf=yes |
| show ospf route abr | routing ospf area-border-router print |
| show ospf route asbr | routing ospf as-border-router print |
| edit protocols ospf | /routing ospf instance |
| set routing-options router-id 203.0.113.1 | /routing ospf instance set 0 router-id=203.0.113.2 |
| set protocols ospf area 0.0.0.0 interface lo0.0 | /routing ospf network add area=backbone network=203.0.113.2/32 |
| set protocols ospf area 0.0.0.0 interface ge-0/0/0.0 | /routing ospf network add area=backbone network=203.0.113.128/29 |
| set protocols ospf area 0.0.0.0 interface ge-0/0/0.0 interface-type p2p set protocols ospf area 0.0.0.0 interface ge-0/0/0.0 hello-interval 1 set protocols ospf area 0.0.0.0 interface ge-0/0/0.0 dead-interval 4 | /routing ospf interface add dead-interval=4s hello-interval=1s interface=ether1 network-type=point-to-point |
Examples of the commands above
This first command will show you all of the routers you have an OSPF neighbor adjacency with.
[admin@MIKROTIK-OSPF] > routing ospf neighbor print

root@JUNOS-OSPF> show ospf neighbor

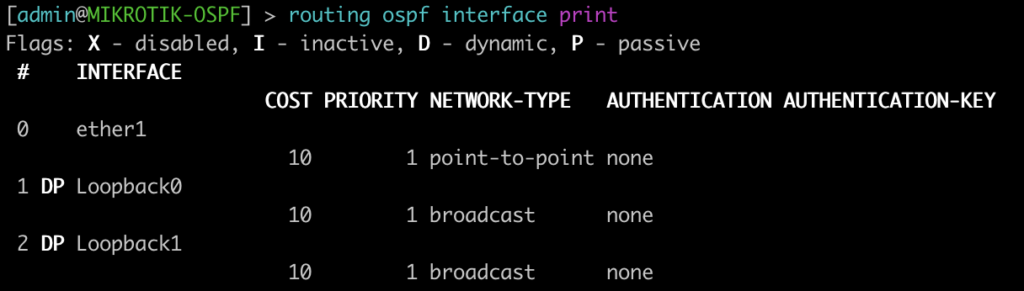
This next command lists all of the interface enabled for OSPF as well as some basic information such as cost, priority, and network type. Juniper displays slightly different information such as area, DR info, and number of neighbors. Juniper does not have the concept of a network statement so interfaces explicitly configured for OSPF will appear here. You can optionally add the detail command on JunOS for more information.
[admin@MIKROTIK-OSPF] > routing ospf interface print
root@JUNOS-OSPF> show ospf interface

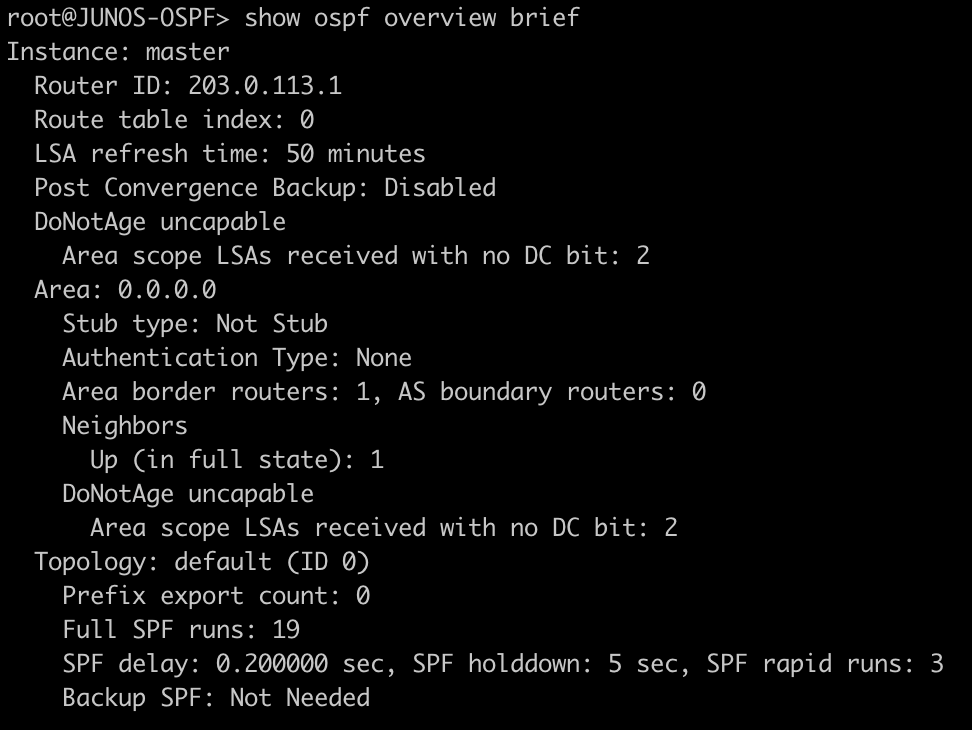
This command will list all of the details regarding the OSPF instances running on the router.
[admin@MIKROTIK-OSPF] > routing ospf instance print

root@JUNOS-OSPF> show ospf overview brief
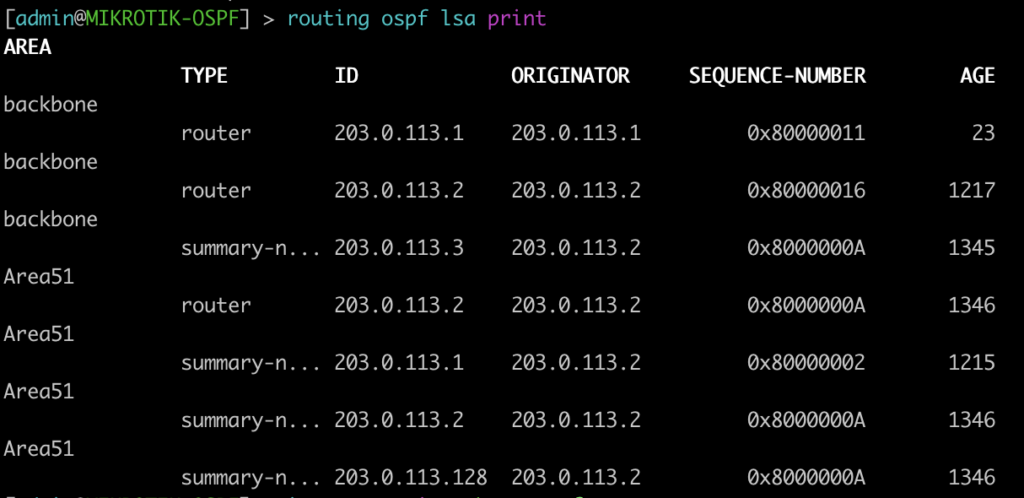
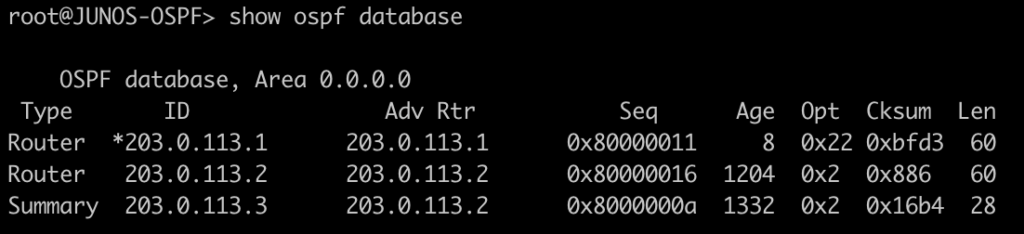
This command lists all of the OSPF LSAs as well as some details about them.
[admin@MIKROTIK-OSPF] > routing ospf lsa print
root@JUNOS-OSPF> show ospf database
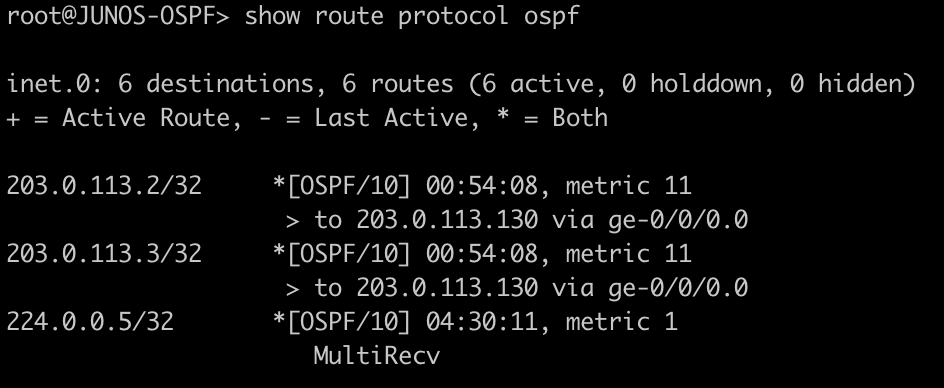
This next command will show all of the OSPF routes in the routing table.
[admin@MIKROTIK-OSPF] > ip route print where ospf=yes

root@JUNOS-OSPF> show route protocol ospf
This next set of commands will show you the area-border-routers or autonomous-system-boundary routers. We injected a connected route into OSPF to generate a type-5 LSA for an external route.
[admin@MIKROTIK-OSPF] > routing ospf area-border-router print
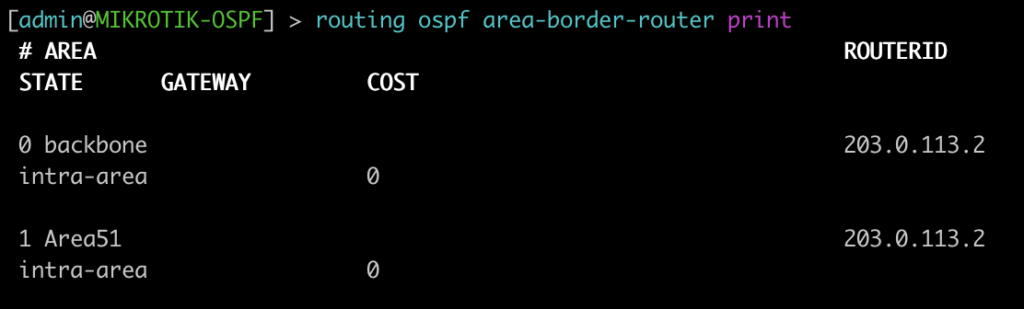
[admin@MIKROTIK-OSPF] > routing ospf as-border-router print

root@JUNOS-OSPF> show ospf route abr

root@JUNOS-OSPF> show ospf route asbr

Mikrotik OSPF configuration
/interface bridge
add name=Loopback0
add name=Loopback1
add name=Loopback2
/interface wireless security-profiles
set [ find default=yes ] supplicant-identity=MikroTik
/routing ospf area
add area-id=0.0.0.51 name=Area51
/routing ospf instance
set [ find default=yes ] redistribute-connected=as-type-1 router-id=203.0.113.2
/ip address
add address=203.0.113.2 interface=Loopback0 network=203.0.113.2
add address=203.0.113.3 interface=Loopback1 network=203.0.113.3
add address=203.0.113.4 interface=Loopback2 network=203.0.113.4
add address=203.0.113.130/29 interface=ether1 network=203.0.113.128
/ip dhcp-client
add dhcp-options=hostname,clientid disabled=no interface=ether1
/routing ospf interface
add dead-interval=4s hello-interval=1s interface=ether1 network-type=point-to-point
/routing ospf network
add area=backbone network=203.0.113.2/32
add area=backbone network=203.0.113.128/29
add area=Area51 network=203.0.113.3/32
/system identity
set name=MIKROTIK-OSPF
Juniper OSPF configuration
set interfaces ge-0/0/0 unit 0 family inet address 203.0.113.129/29
set interfaces lo0 unit 0 family inet address 203.0.113.1/32
set routing-options router-id 203.0.113.1
set protocols ospf area 0.0.0.0 interface ge-0/0/0.0 interface-type p2p
set protocols ospf area 0.0.0.0 interface ge-0/0/0.0 hello-interval 1
set protocols ospf area 0.0.0.0 interface ge-0/0/0.0 dead-interval 4
set protocols ospf area 0.0.0.0 interface lo0.0 passive
More Juniper to MikroTik articles are on the way!
This article covered some of basic and common OSPF commands. Check back in the future for examples of more advanced features and capabilities. Also stay tuned for our upcoming Juniper to MikroTik MPLS command translation.